Set your baseplate up for success
To ensure the best possible start on your digital submission for the BrickLink Designer Program (BDP), please review our guidelines carefully.
The following rules are here to make sure models pass through the governing processes of BDP smoothly. We’re not trying to stifle creativity or limit your ability to do excellent work. In past programs, we’ve had challenges getting fan designs approved for model safety, stability, and building experience. So we have developed these guidelines to prevent the kinds of issues we have seen going forward.
Also, please note that we do not aim to reject submissions for minor issues. The submission period exists to help us review and work with Fan Designers to correct any issues that we find. Please do not hesitate to submit your model with the fear that we will reject your model.
Learn about Series 8 Submission Guidelines
Series 8 Updates
Theme:
Models may not be based off the following internal LEGO IP:
NINJAGO®, Dreamzzz, Friends, Monkie Kid, BrickHeadz and the ICONS Modular format.
Minifigures:
Each minifigure head may only be used once. Skeleton, statue, classic smile and alien heads do not apply to this rule.
Digital building
You will be required to build your design in Studio and upload a .io Studio file for your submission.
Set your Studio file up for success when designing for BDP by doing the following:
-
Build your creations using the current BDP Series Palette.
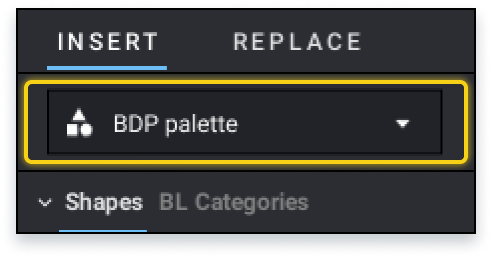
Note that the current BDP Series Palette elements may be subject to change.
Tips
Get to know the dedicated BDP palette of elements before you start building. Make this palette the foundation of your creative efforts and use it to its fullest extent.
-
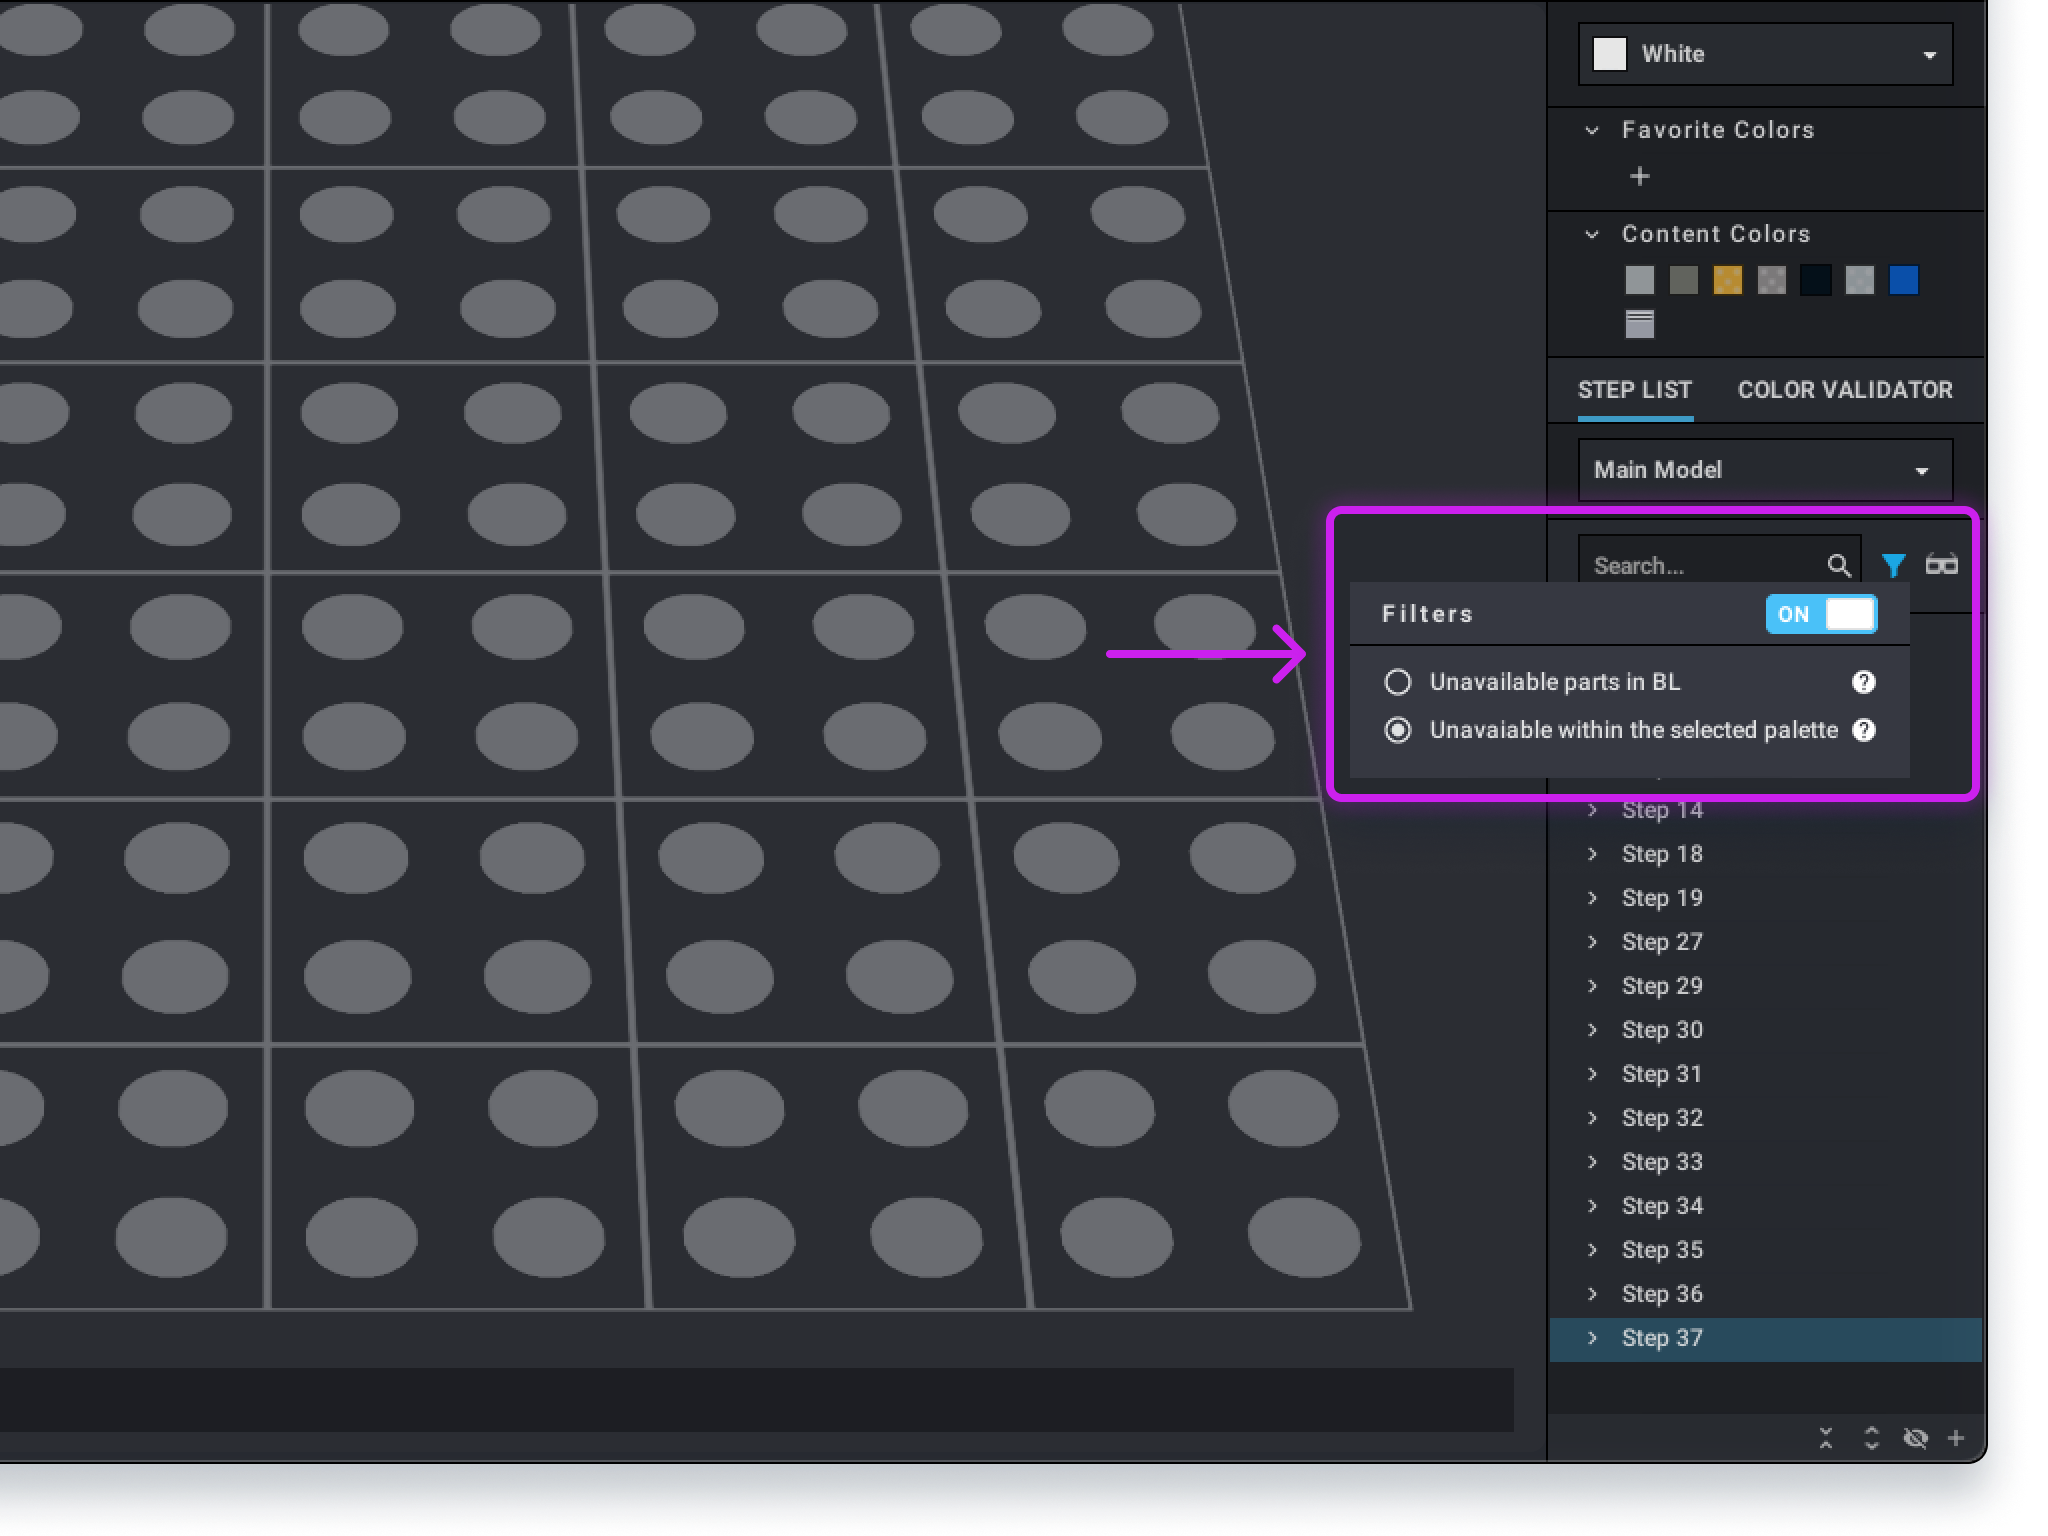
Turn on the Color Palette Filter and select the “within the selected palette” option.
-
Turn on the Collision feature by clicking on the icon in the top tool bar until it turns red.

-
Turn on the Snap feature by clicking on the icon in the top tool bar until it turns Blue.

-
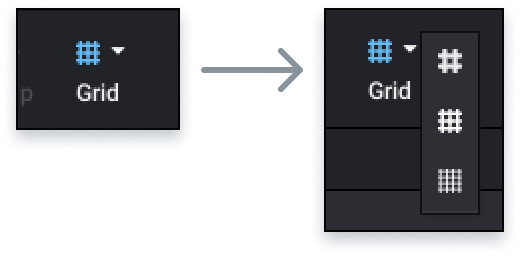
Select the grid size that works for you by clicking on the icon in the top tool bar menu and choosing one of the three options in the dropdown.
-
Periodically check the model stability. To do this, turn on the Stability feature by clicking on the icon in the top tool bar until it turns blue. Use this tool to check hinge elements and any tall or intricate areas.
-
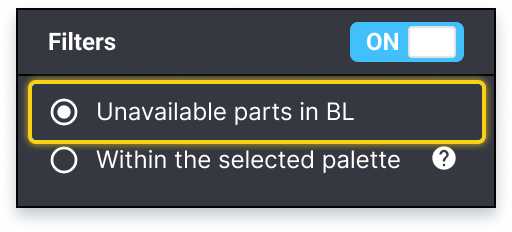
Periodically validate your parts list. To do this, turn on the Step List Part Filter and select “unavailable parts.” Use this tool to check if you have any invalid parts in your creation.
-
Every day, close your Studio software and restart it so you can receive software updates.
Design Requirements
-
Make sure your theme is appropriate for a family-friendly audience. Just because we’re targeting adults doesn’t mean we can use themes that are inappropriate for kids. This includes models that depict:
- Politics, political symbols, campaigns, or movements and religious references including symbols, buildings, or people.
- Models cannot be based on modern weapons of war, or life-size replicas of weapons.
- Please note the detailed Content Restrictions in the Terms of Service, Section 7.
Don’t use Intellectual Property (IP) that belongs to anyone else, including the LEGO Group (e.g., Star Wars™, NINJAGO®, etc.). This includes references to IP in your model description.
-
In order to help us project a vision of a sustainable future, we wish for you to adhere to these additional guidelines:
- Avoid depicting harm to animals (e.g. hunting and trapping; tied-up, caged or dead animals). Fishing is acceptable as well as the usage of any standard element that is used to depict a food element (e.g. part 64648).
- Avoid depicting wild animals in zoos, circuses, aquariums or other situations that are designed for human entertainment. Please only show wild animals in their natural habitats.
- Avoid highlighting fossil fuels like coal, oil, and gas (e.g. depicting refineries, fuel storage or gas stations). It’s acceptable to showcase historical methods of transportation that rely on fossil fuels (e.g. steam locomotives). When honoring existing real-world vehicles, fossil-fueled ones are acceptable. For generic vehicles, consider making them electric to fit a playable and fantastic universe.
- Avoid showing any destruction of natural environments for human benefit (e.g., deforestation, logging, mining, land development, monoculture plantations, etc.)
-
Models may not be based off the following internal LEGO IP:
NINJAGO®, Dreamzzz, Friends, Monkie Kid, BrickHeadz and the ICONS Modular format.
Buildings are acceptable to submit to BDP, but they should not reflect the Modular format. If a building looks similar to the design language of the ICONS Modular subtheme (row style building, separating floors, etc) it should use a different base technique. Buildings should also not copy the ICONS Modular baseplate layout design language directly (32x32 baseplate, sidewalk with lamps, Technic connection points). When we review BDP submissions, we will ask “could this model be confused as an ICONS Modular building?”
-
Don’t piggyback on an existing LEGO set by building a model that is an extension or a companion to a specific set in the portfolio. Loose associations are fine, castles look like castle and pirate ships look like pirate ships. BrickHeadz style builds are not allowed.
-
Models depicting the LEGO Group trademarks and copyright are not allowed. For example, the minifigure and 2x4 brick are protected IP and therefore we cannot allow submissions containing brick-built versions of these parts. You may create brick-built versions of other LEGO parts. Similarly, mosaics and art where the LEGO logo is the main feature are not allowed. The LEGO logo may be used on stickers, but all uses will be reviewed and approved by the LEGO Group before manufacture if selected
Resources
-
We’ll select a variety of model sizes in each Series, but submissions must contain at least 400 parts and no more than 4,000 parts. These are strict limits. To facilitate and encourage a range of set sizes, we’ll pick five submissions across that range to target a Series with an average part count of 2,500.
-
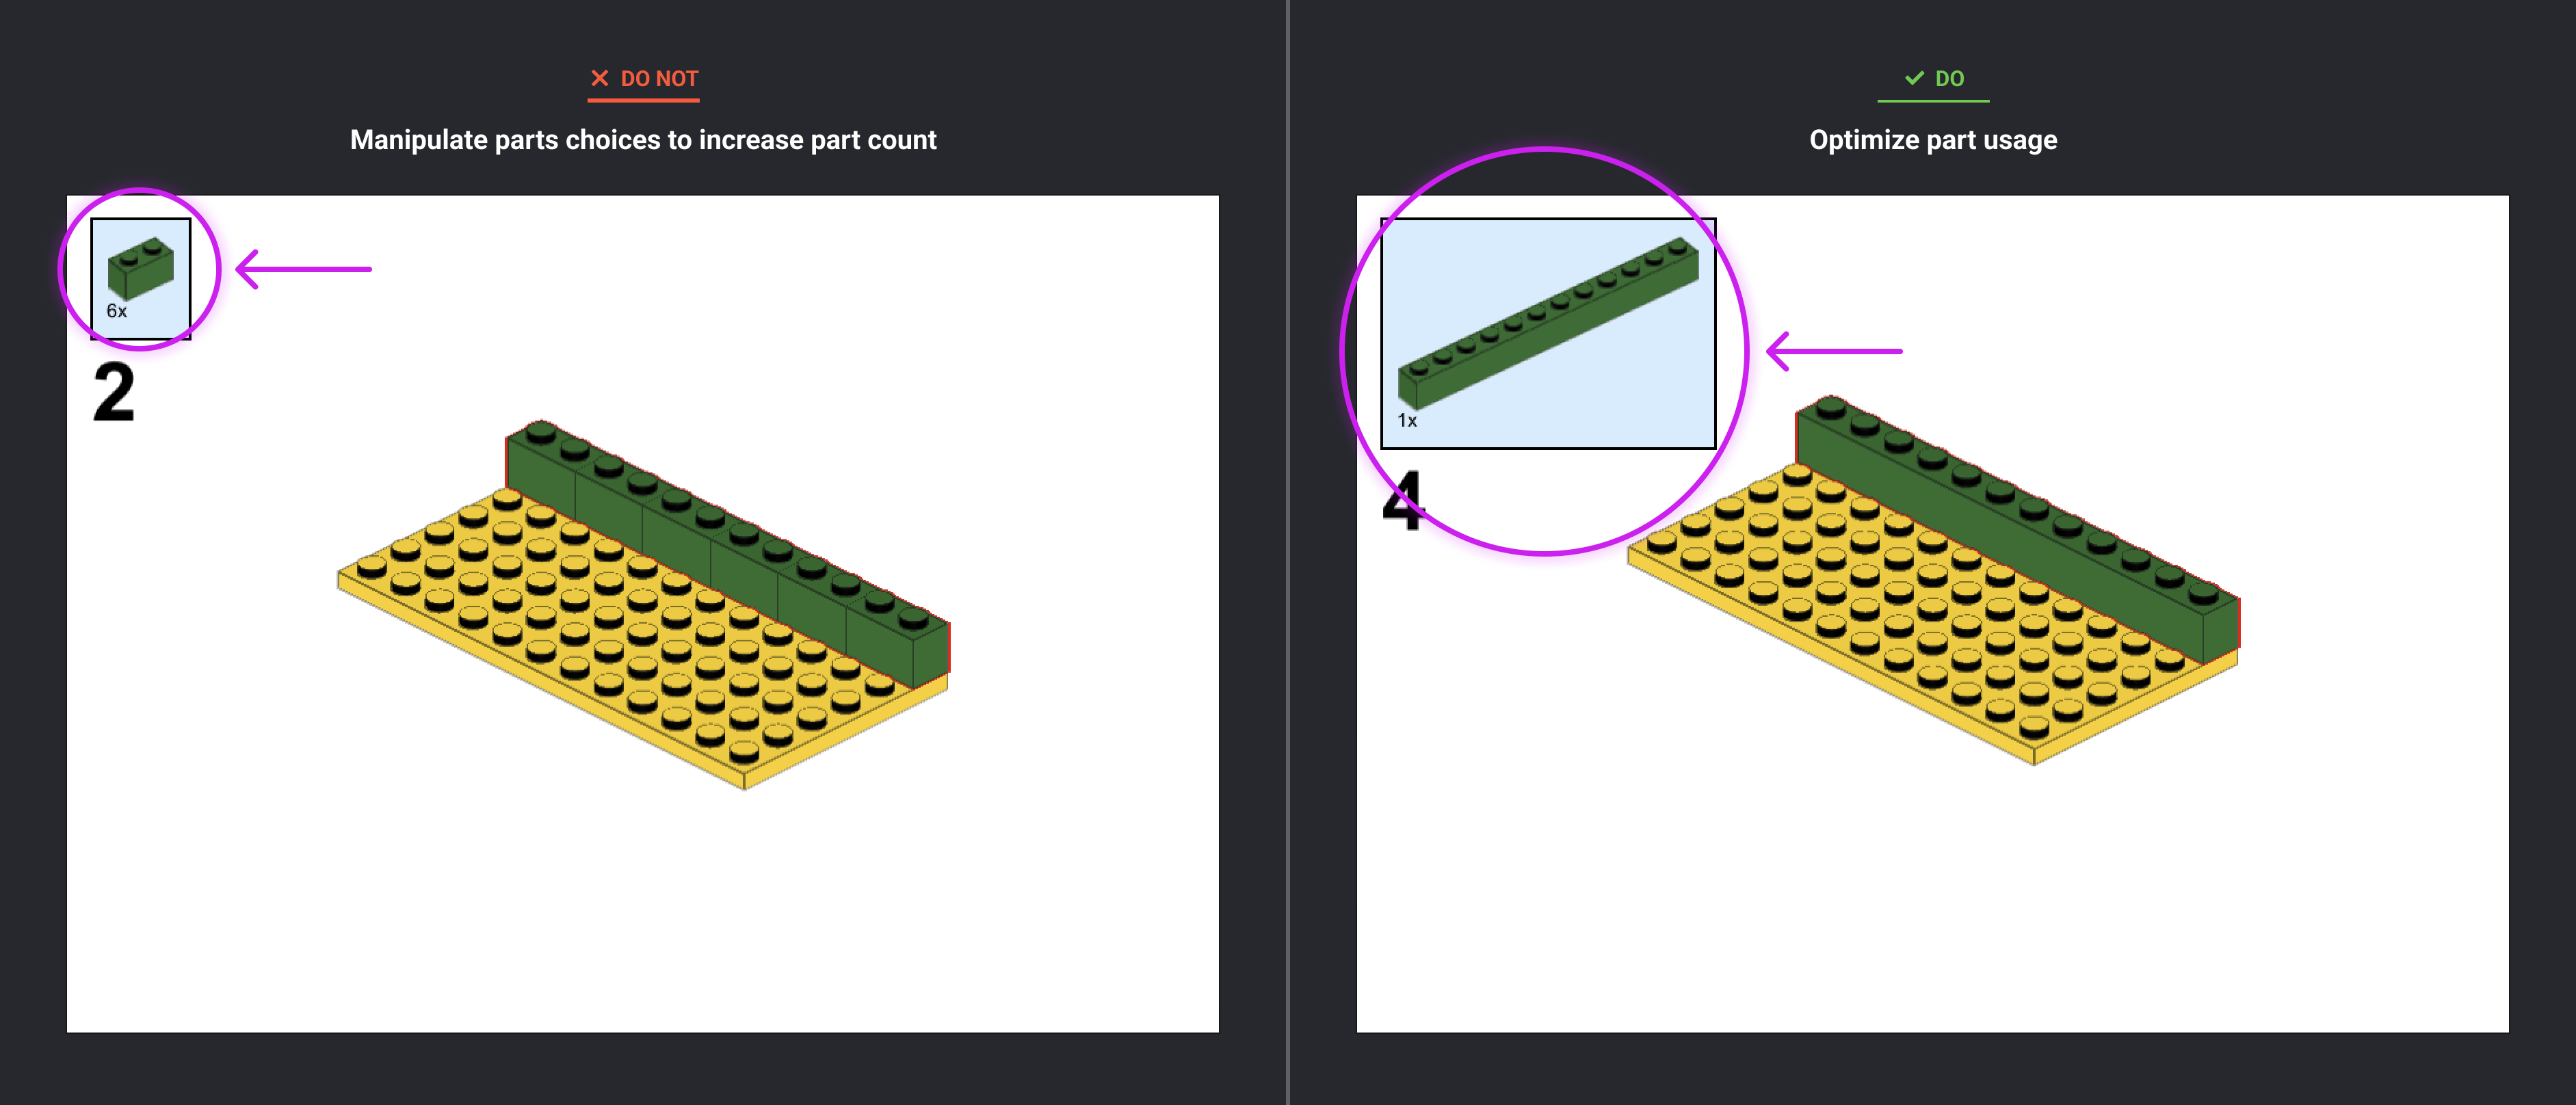
Models should be optimized to use the fewest number of parts possible based on the palette. Don’t manipulate the part count by using a bunch of small parts instead of larger ones.
-
While there’s no hard limit on the number of unique part/color combinations, please don’t add unnecessary complexity to your model.
-
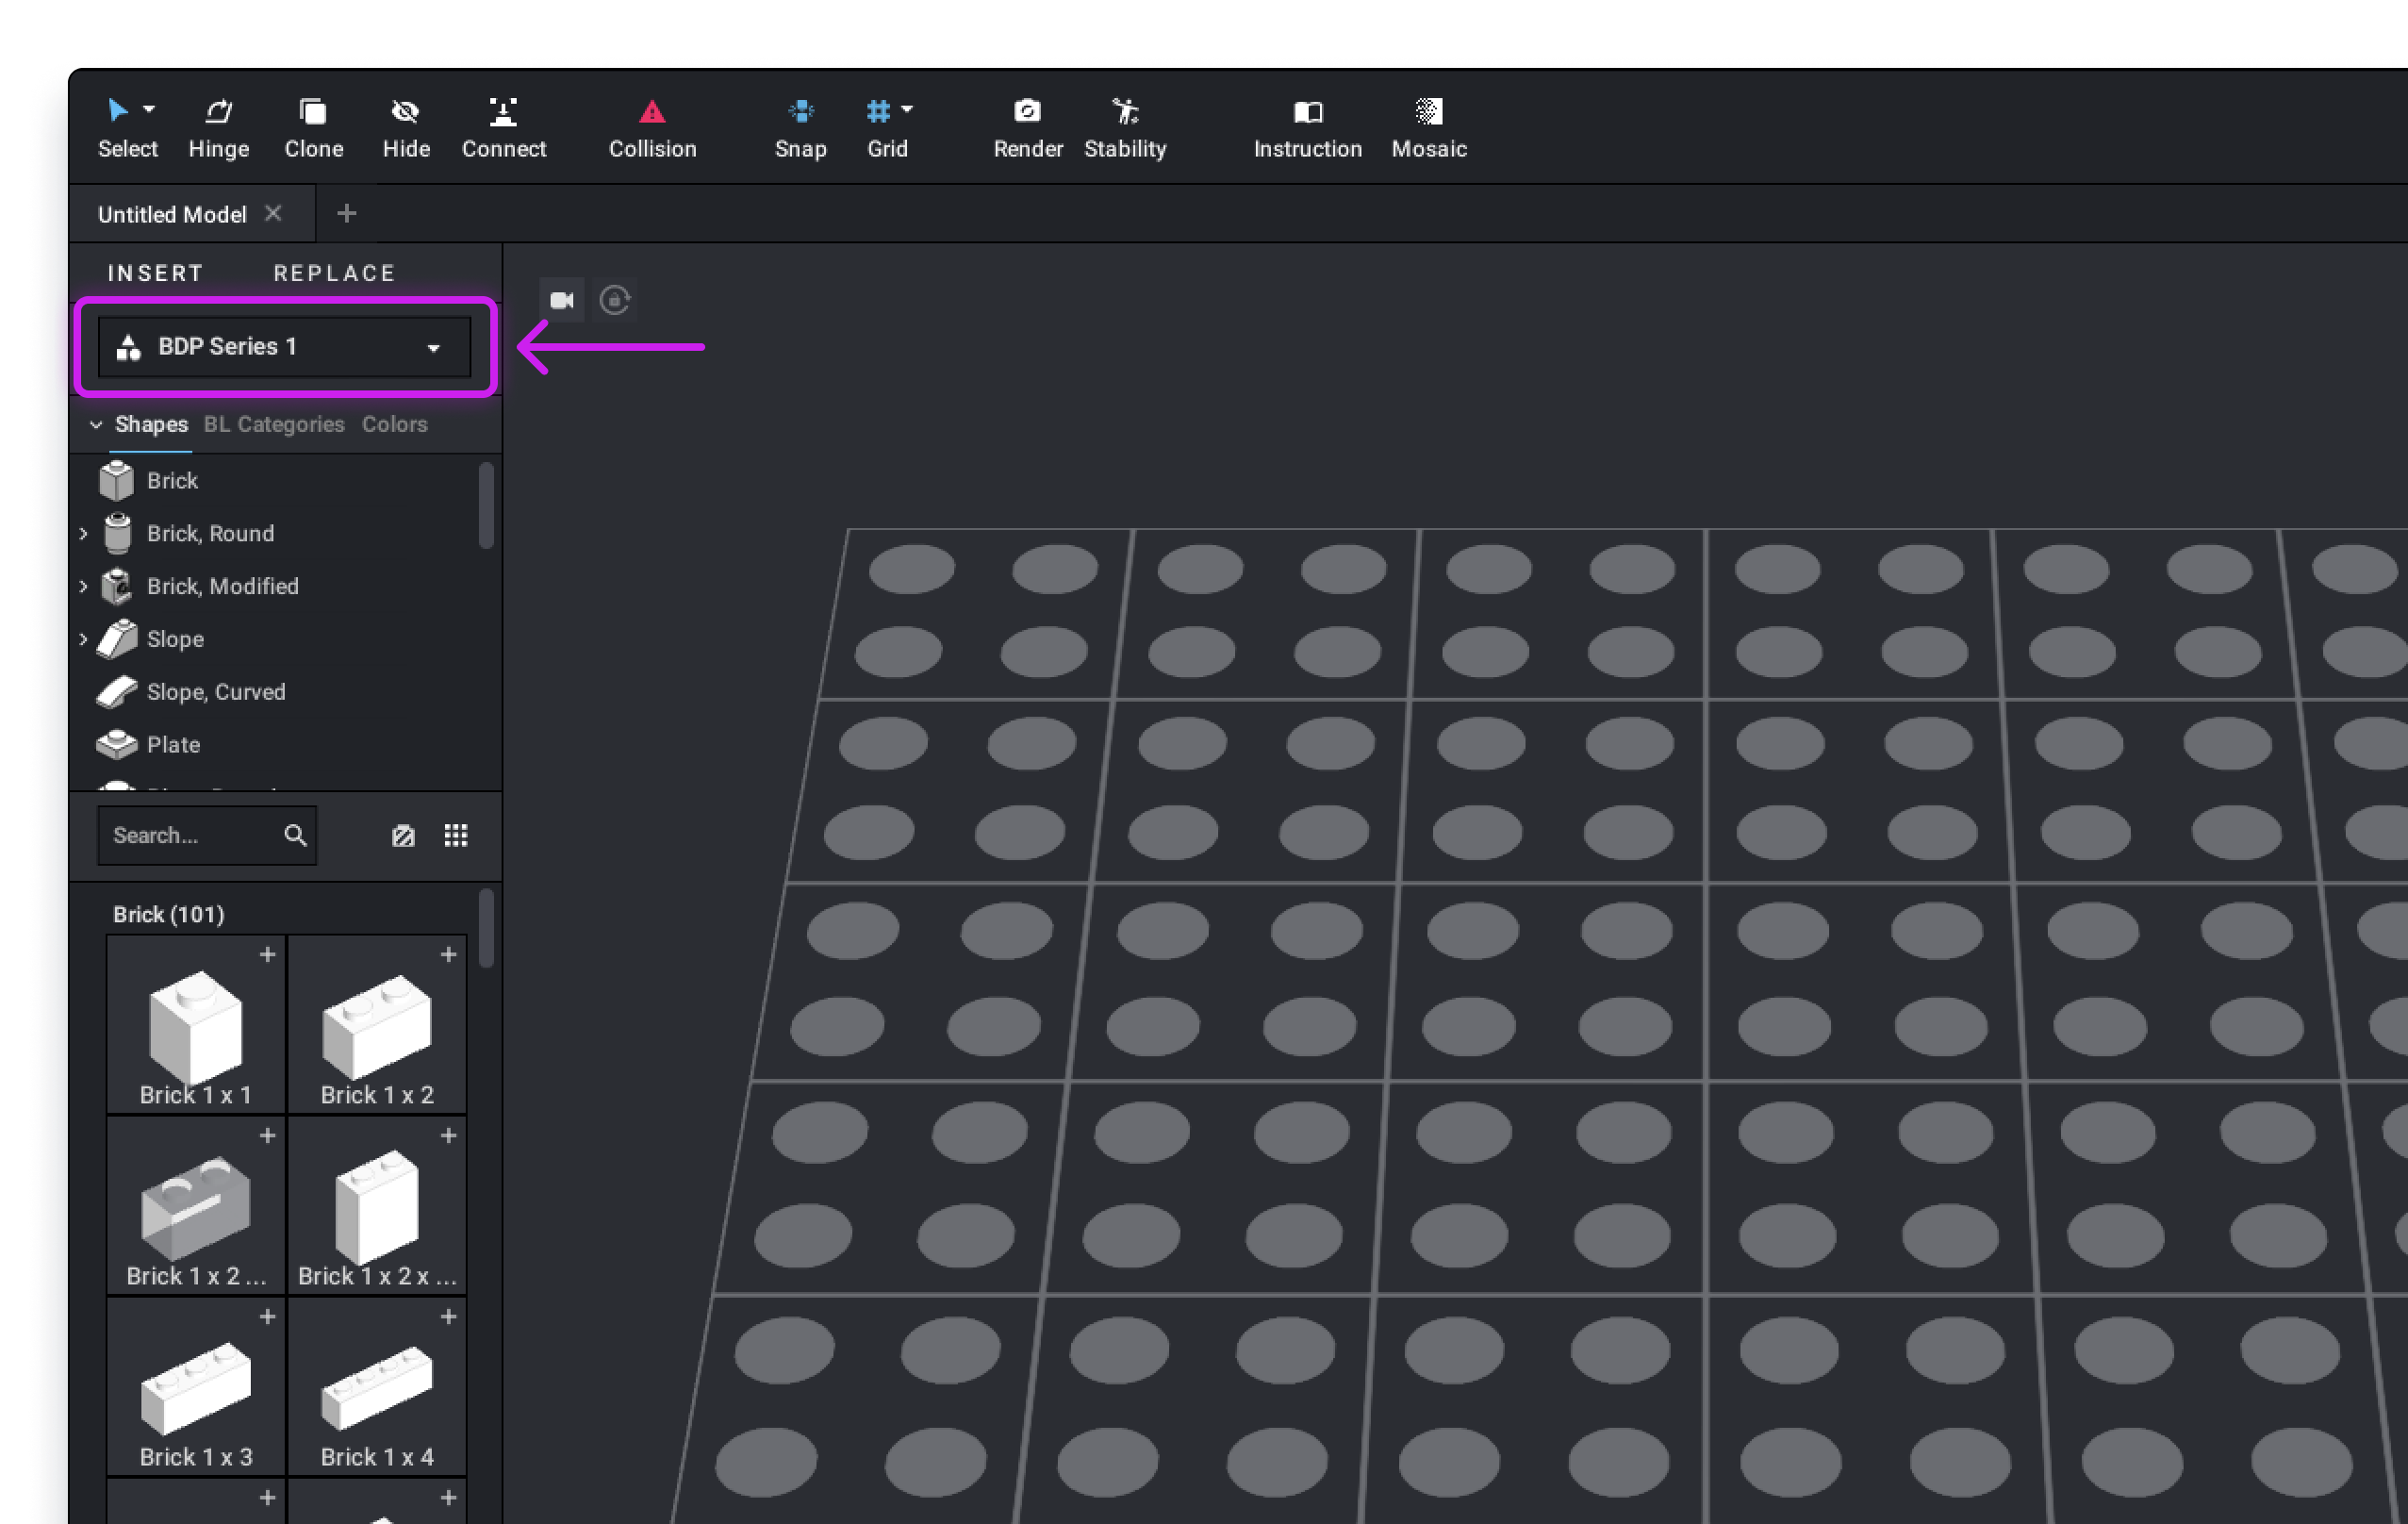
Use only parts found in the current official BrickLink Designer Program palette for the intake period you’re submitting for (e.g., ‘BDP Series 6’). PLEASE NOTE: The palette check does not need to be 100% error-free as stickers are technically custom parts, and released hinges or moved arms on torsos will all trigger errors
-
Turn the Palette Filter on to show you which parts in an existing model are outside the current palette. In the Step List, click the Filters icon, set the toggle to ON, and select “Unavailable within the selected palette.”

-
Some assemblies like minifigure torsos must be broken in Studio to be positioned a certain way. Avoid breaking assemblies whenever possible and include info about any broken assemblies in your notes. NOTE: releasing hinges and minifig torsos/legs will show as invalid parts. Please ignore.
-
It’s helpful to use bright colors inside of a model for the sake of contrast in the building instructions. When doing this, use only basic colors. Don’t use rare colors like Flat Silver, Pearl Gold, Trans-Clear, or Dark Red.
-
Balance your colors, part sizes and shapes. Don’t use an excessive number of printed or expensive parts when a simpler solution would also work.
-
Each minifigure head may only be used once in a submission. Skeleton heads do not apply to this rule.
We have deliberately excluded the following types of parts from the palette: Plain string, most electrical components, fabric parts, plastic sheets and printed parts that have a strong association with existing Intellectual Property (IP).
-
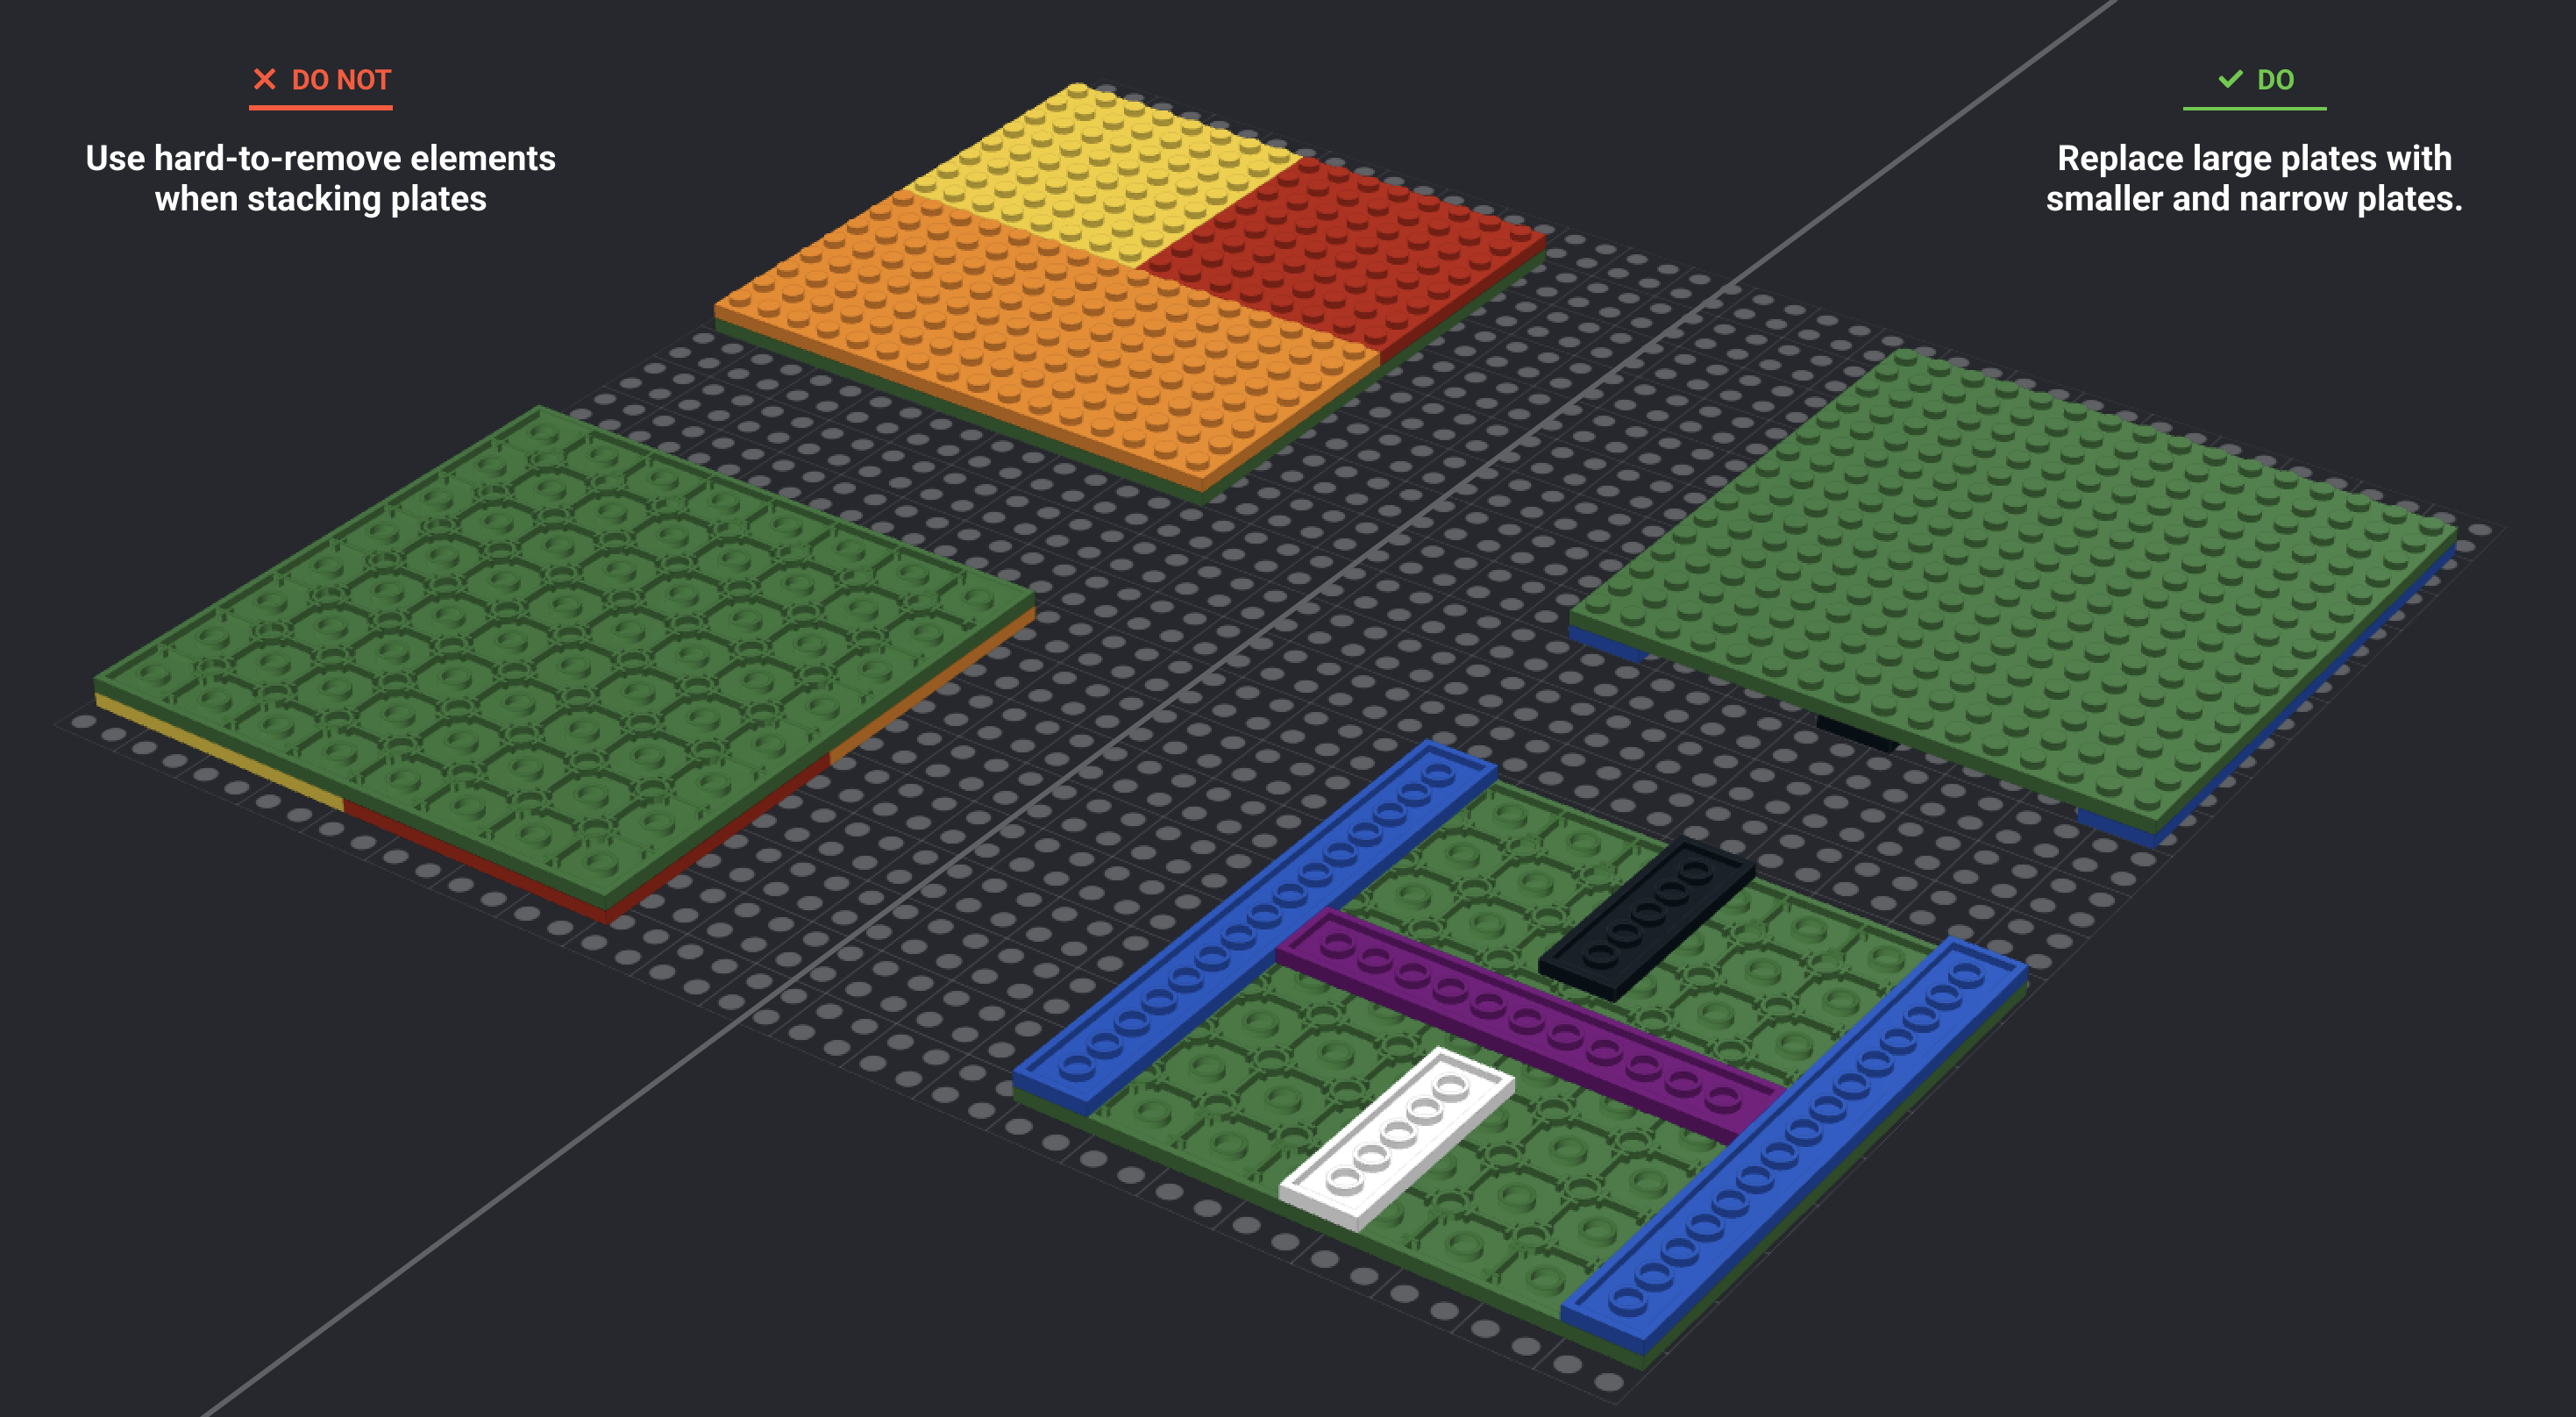
Don’t stack large plates (4x, 6x, 8x) on top of each other or create any other construction that can’t be taken apart easily. An exception to this rule is certain Technic turntables which are assembled this way to function.
-
Hoses, outer cables, and other decorative elements must not be used for structural purposes.
-
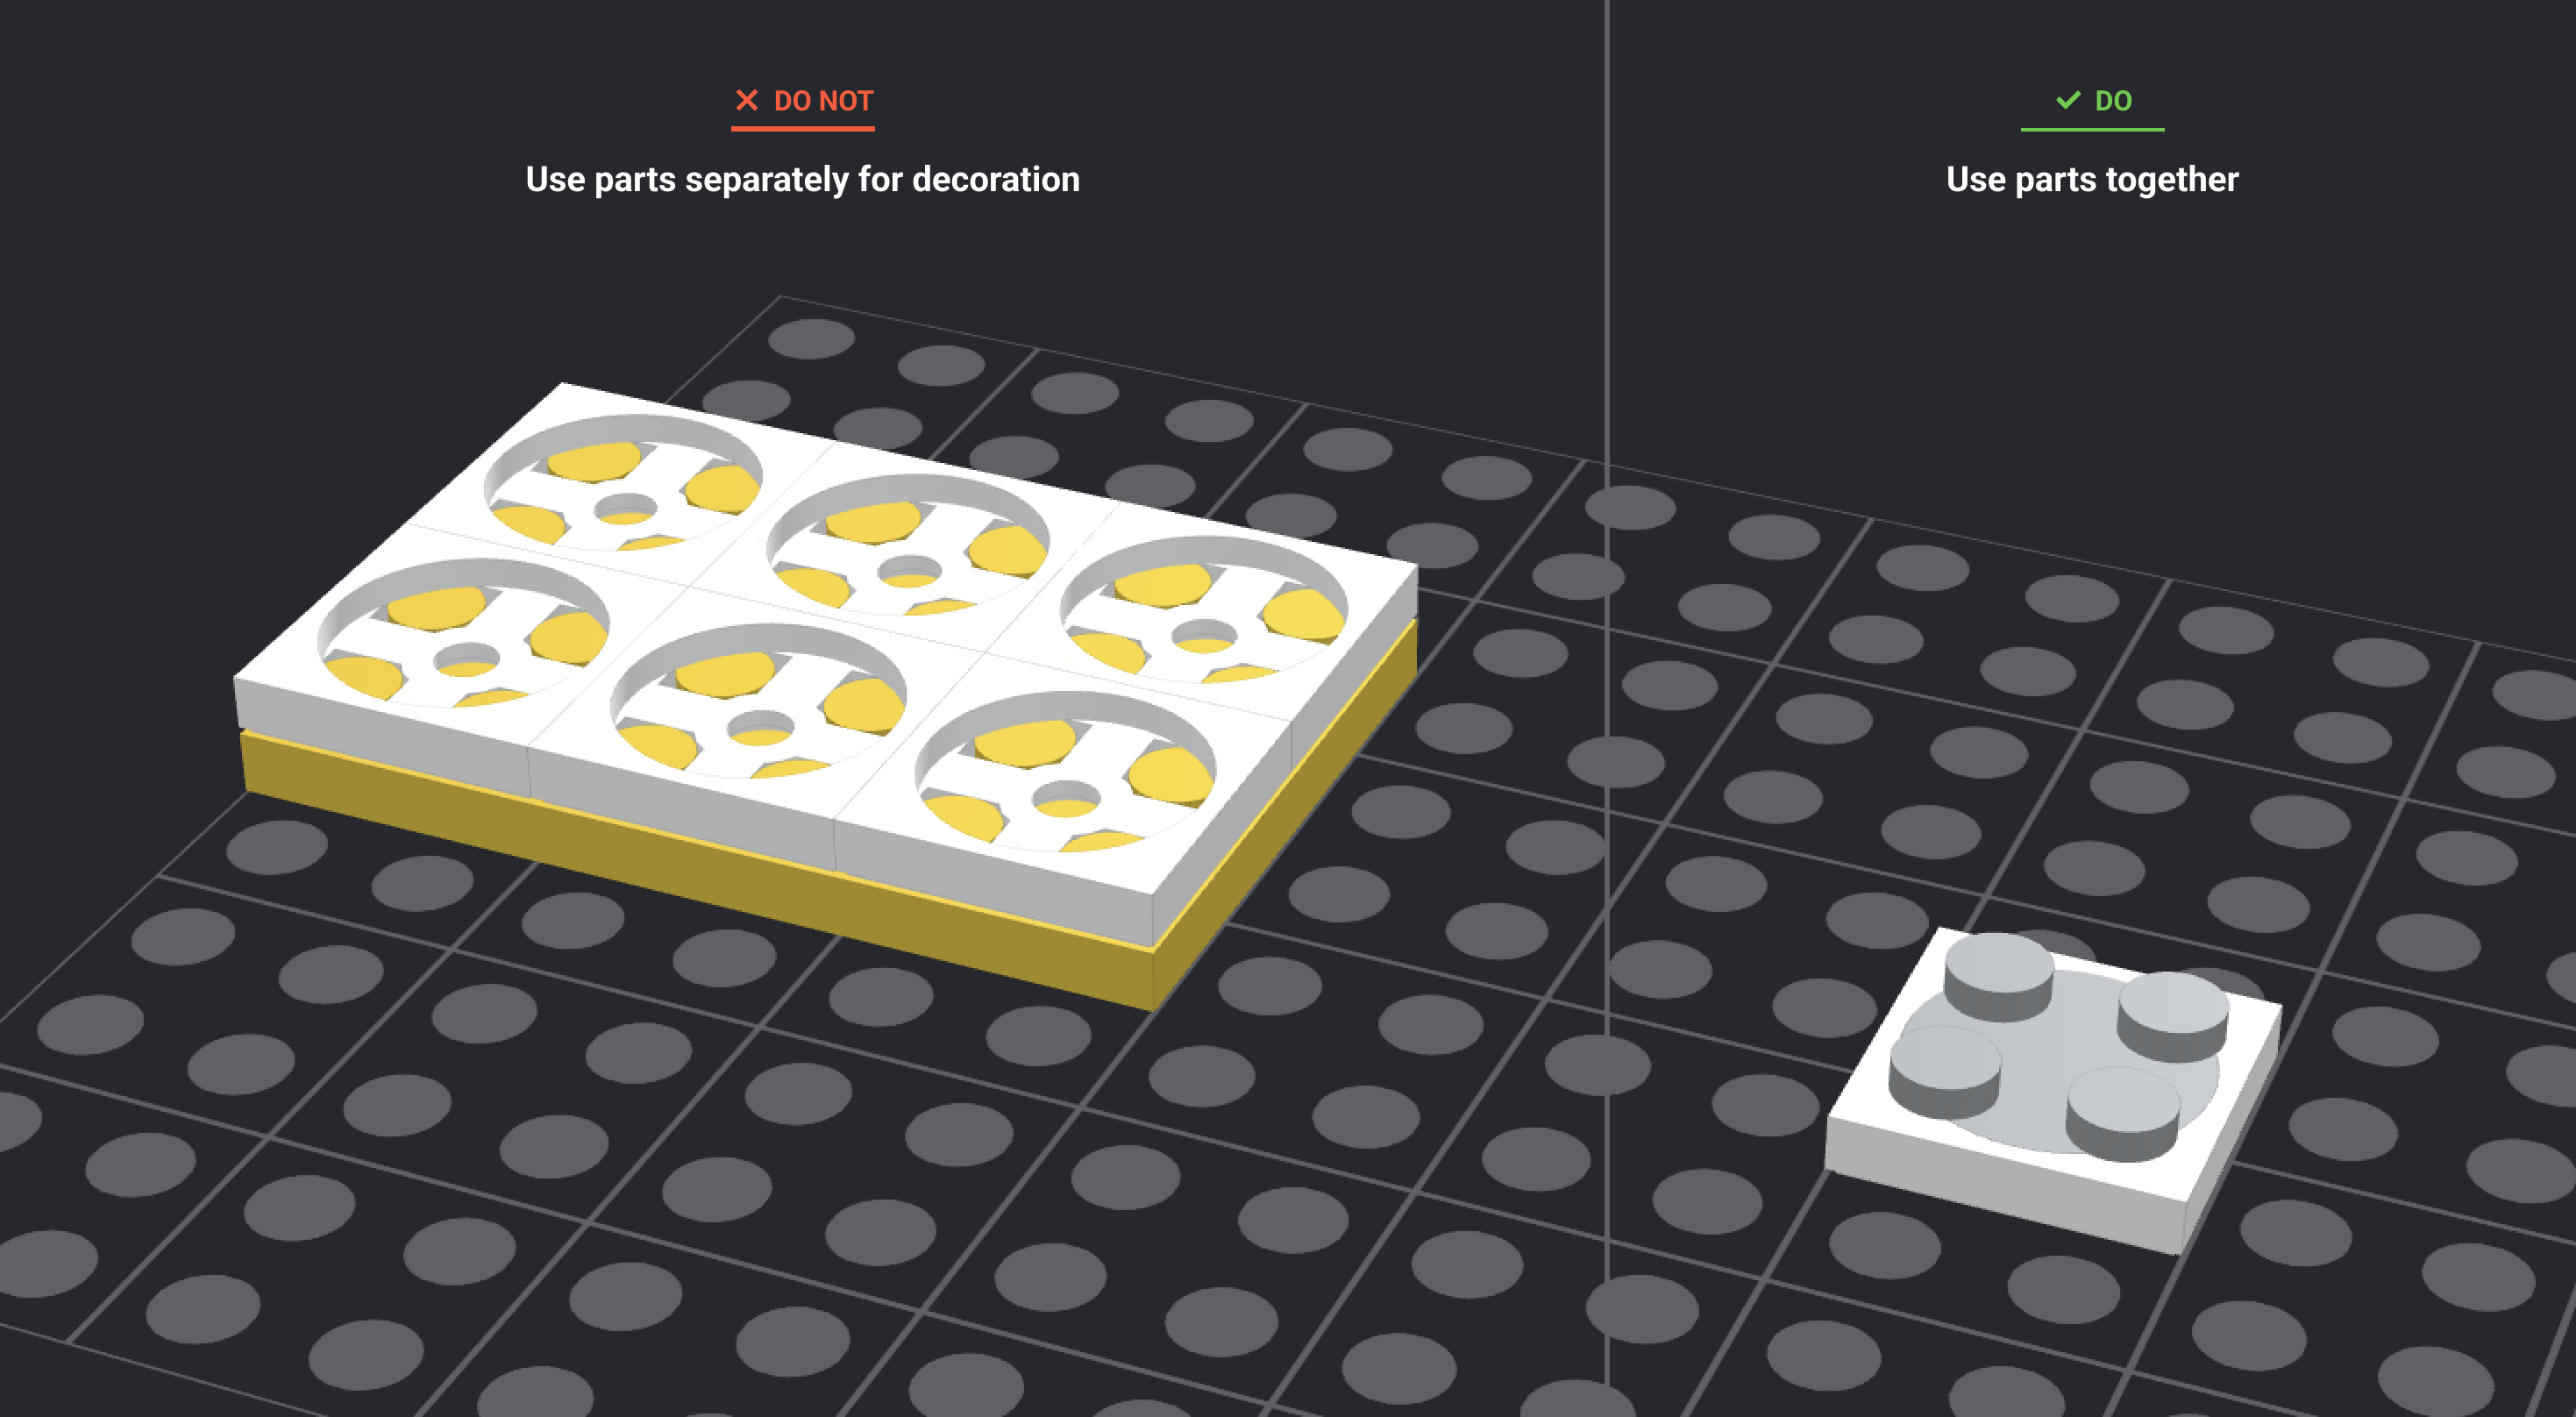
The 2 x 2 turntable base must not be used as a decoration. It must always be paired with the turntable top.
-
Loose parts should be kept to a minimum and should mostly consist of minifigure utensils. Loose parts shouldn’t be poured to fill a space or create an effect (such as water).
-
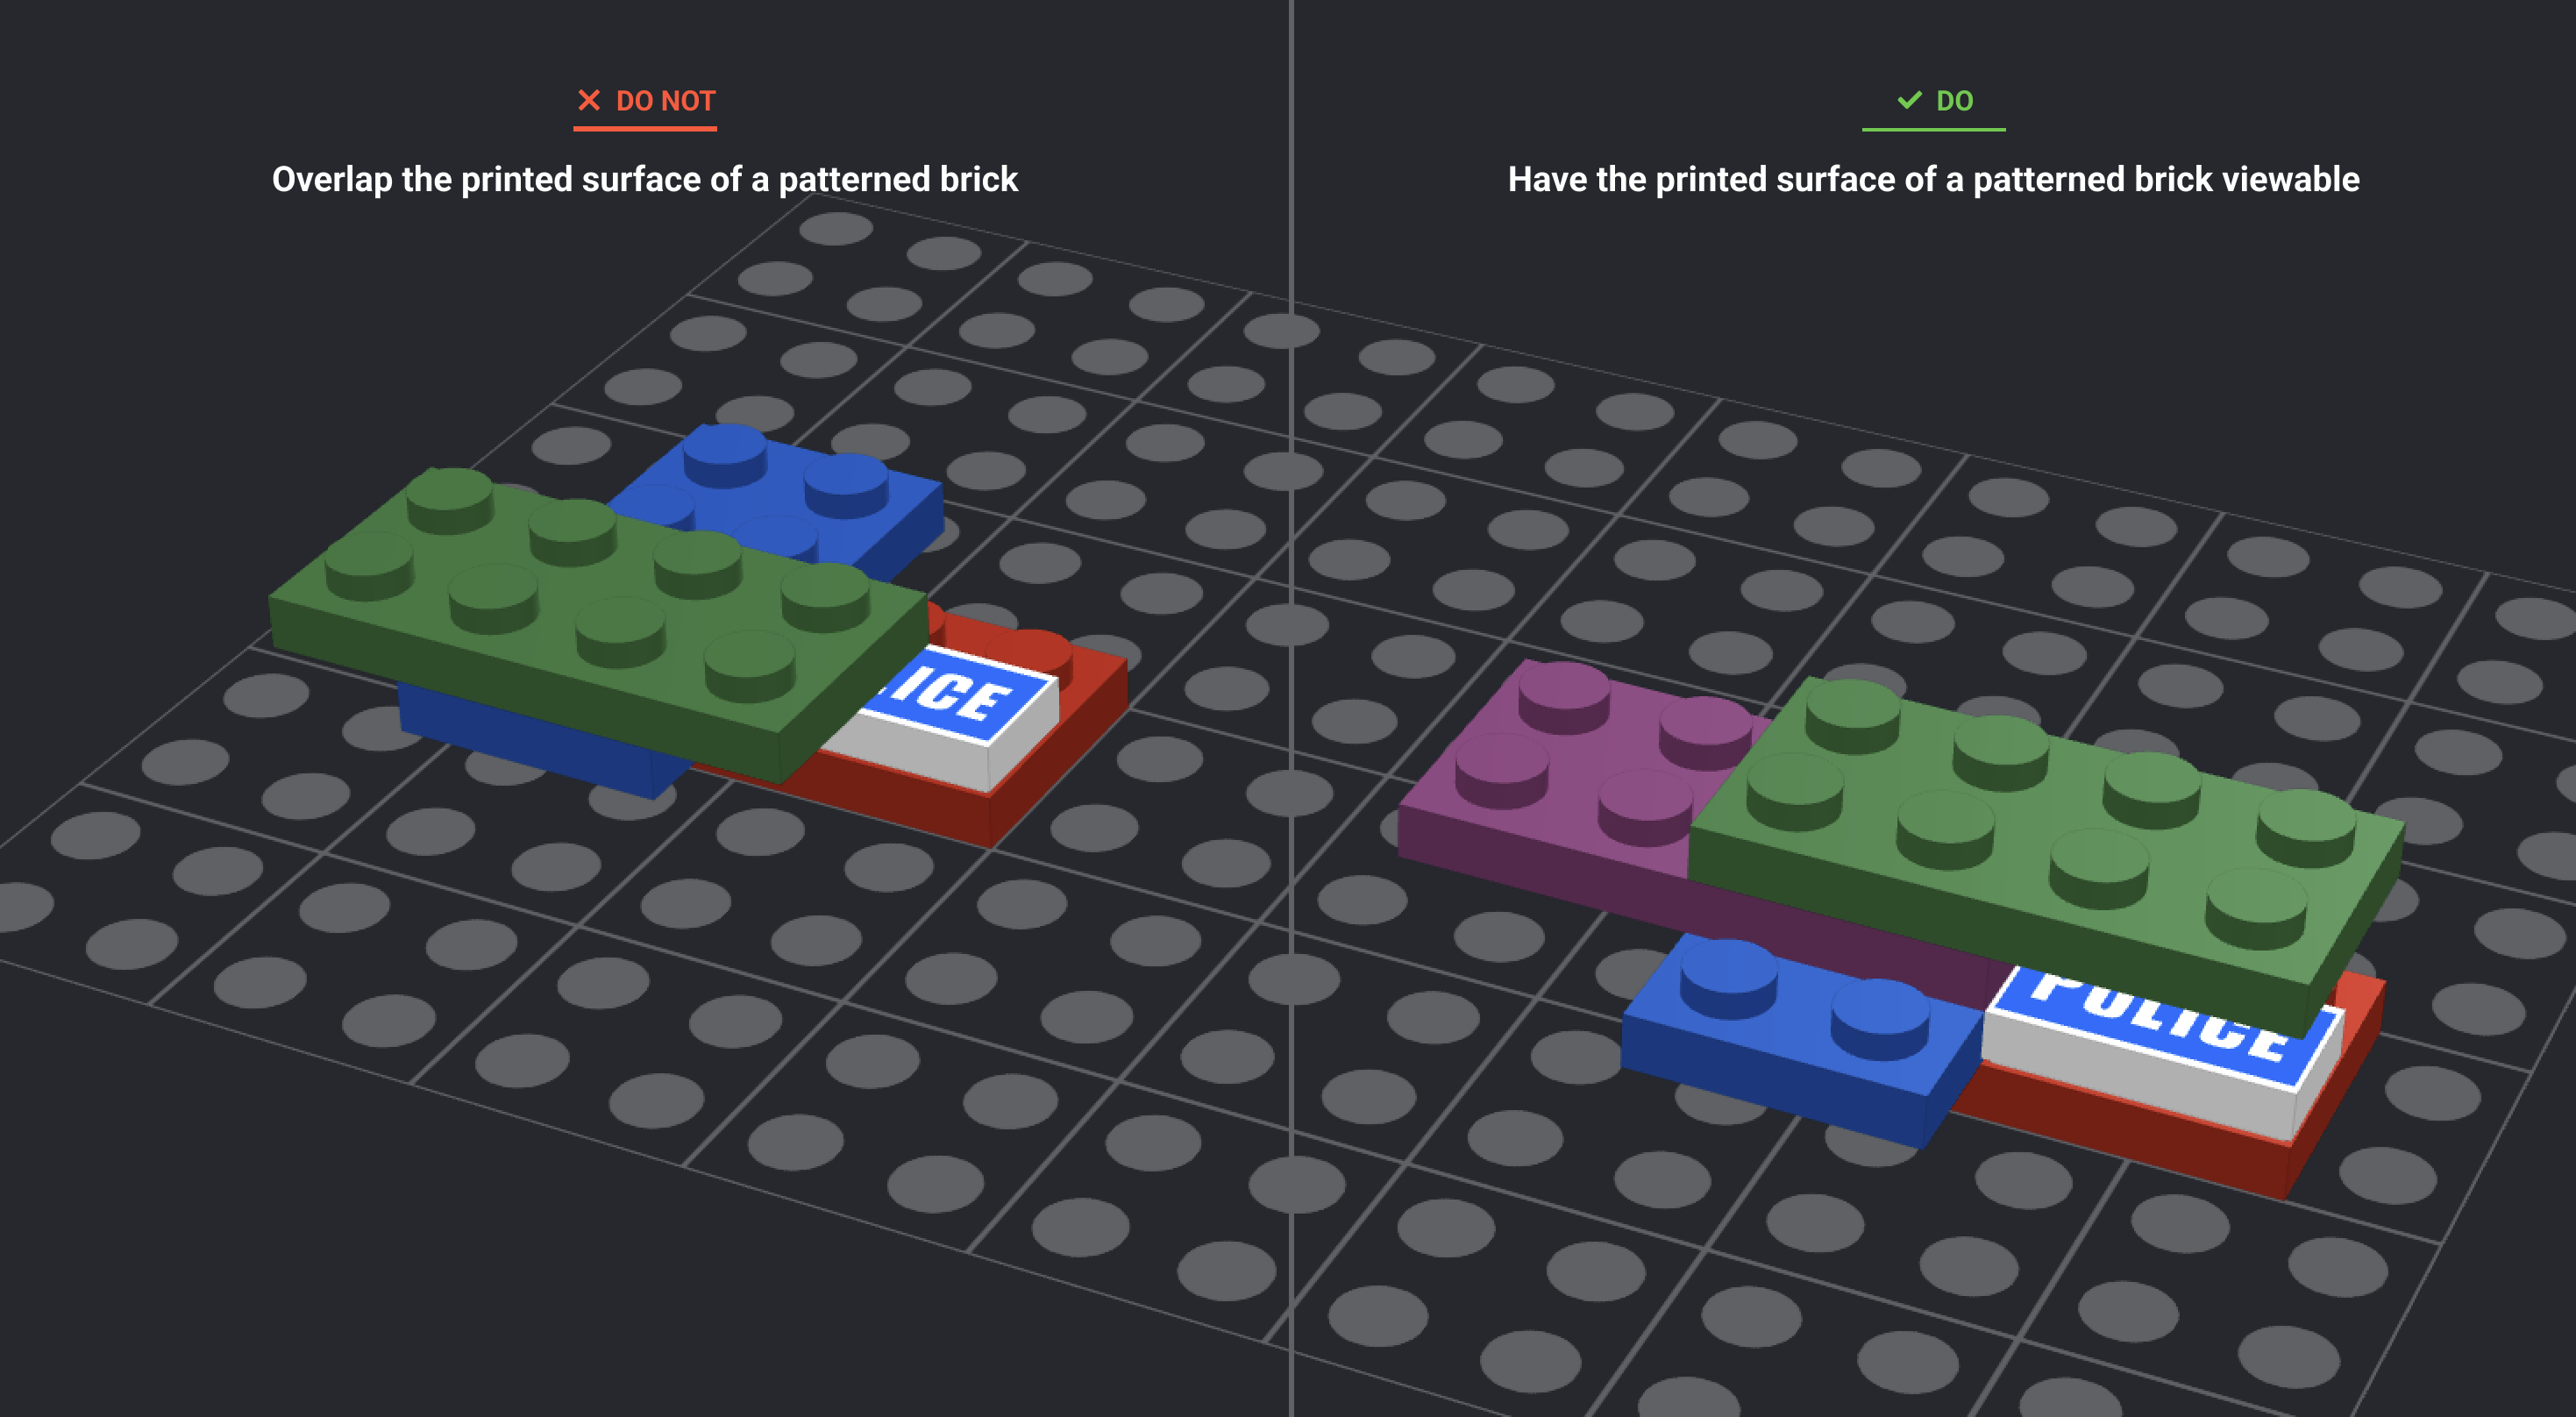
Make sure the printed surface area of a patterned brick isn’t touching other parts.
-
Parts on the edges of a model that are connected by a single stud should be tested physically to make sure they don’t easily fall off.
-
The main issue that comes up is the importance of stability in a model. It’s imperative that every measure is taken BEFORE a model is submitted to make sure it’s going to stay together.
-
When a model is being physically built, parts shouldn’t break, collapse or fall off under normal building pressure.
-
Ideally, the building process should consist of parts being pressed downward on a hard, flat surface. Squeezing bricks together between the fingers or hands is discouraged.
-
There must be enough connecting points to keep parts straight and aligned with the natural planes of the model. Drooping walls or difficulty in aligning studs are signs that the model isn’t strong enough.
-
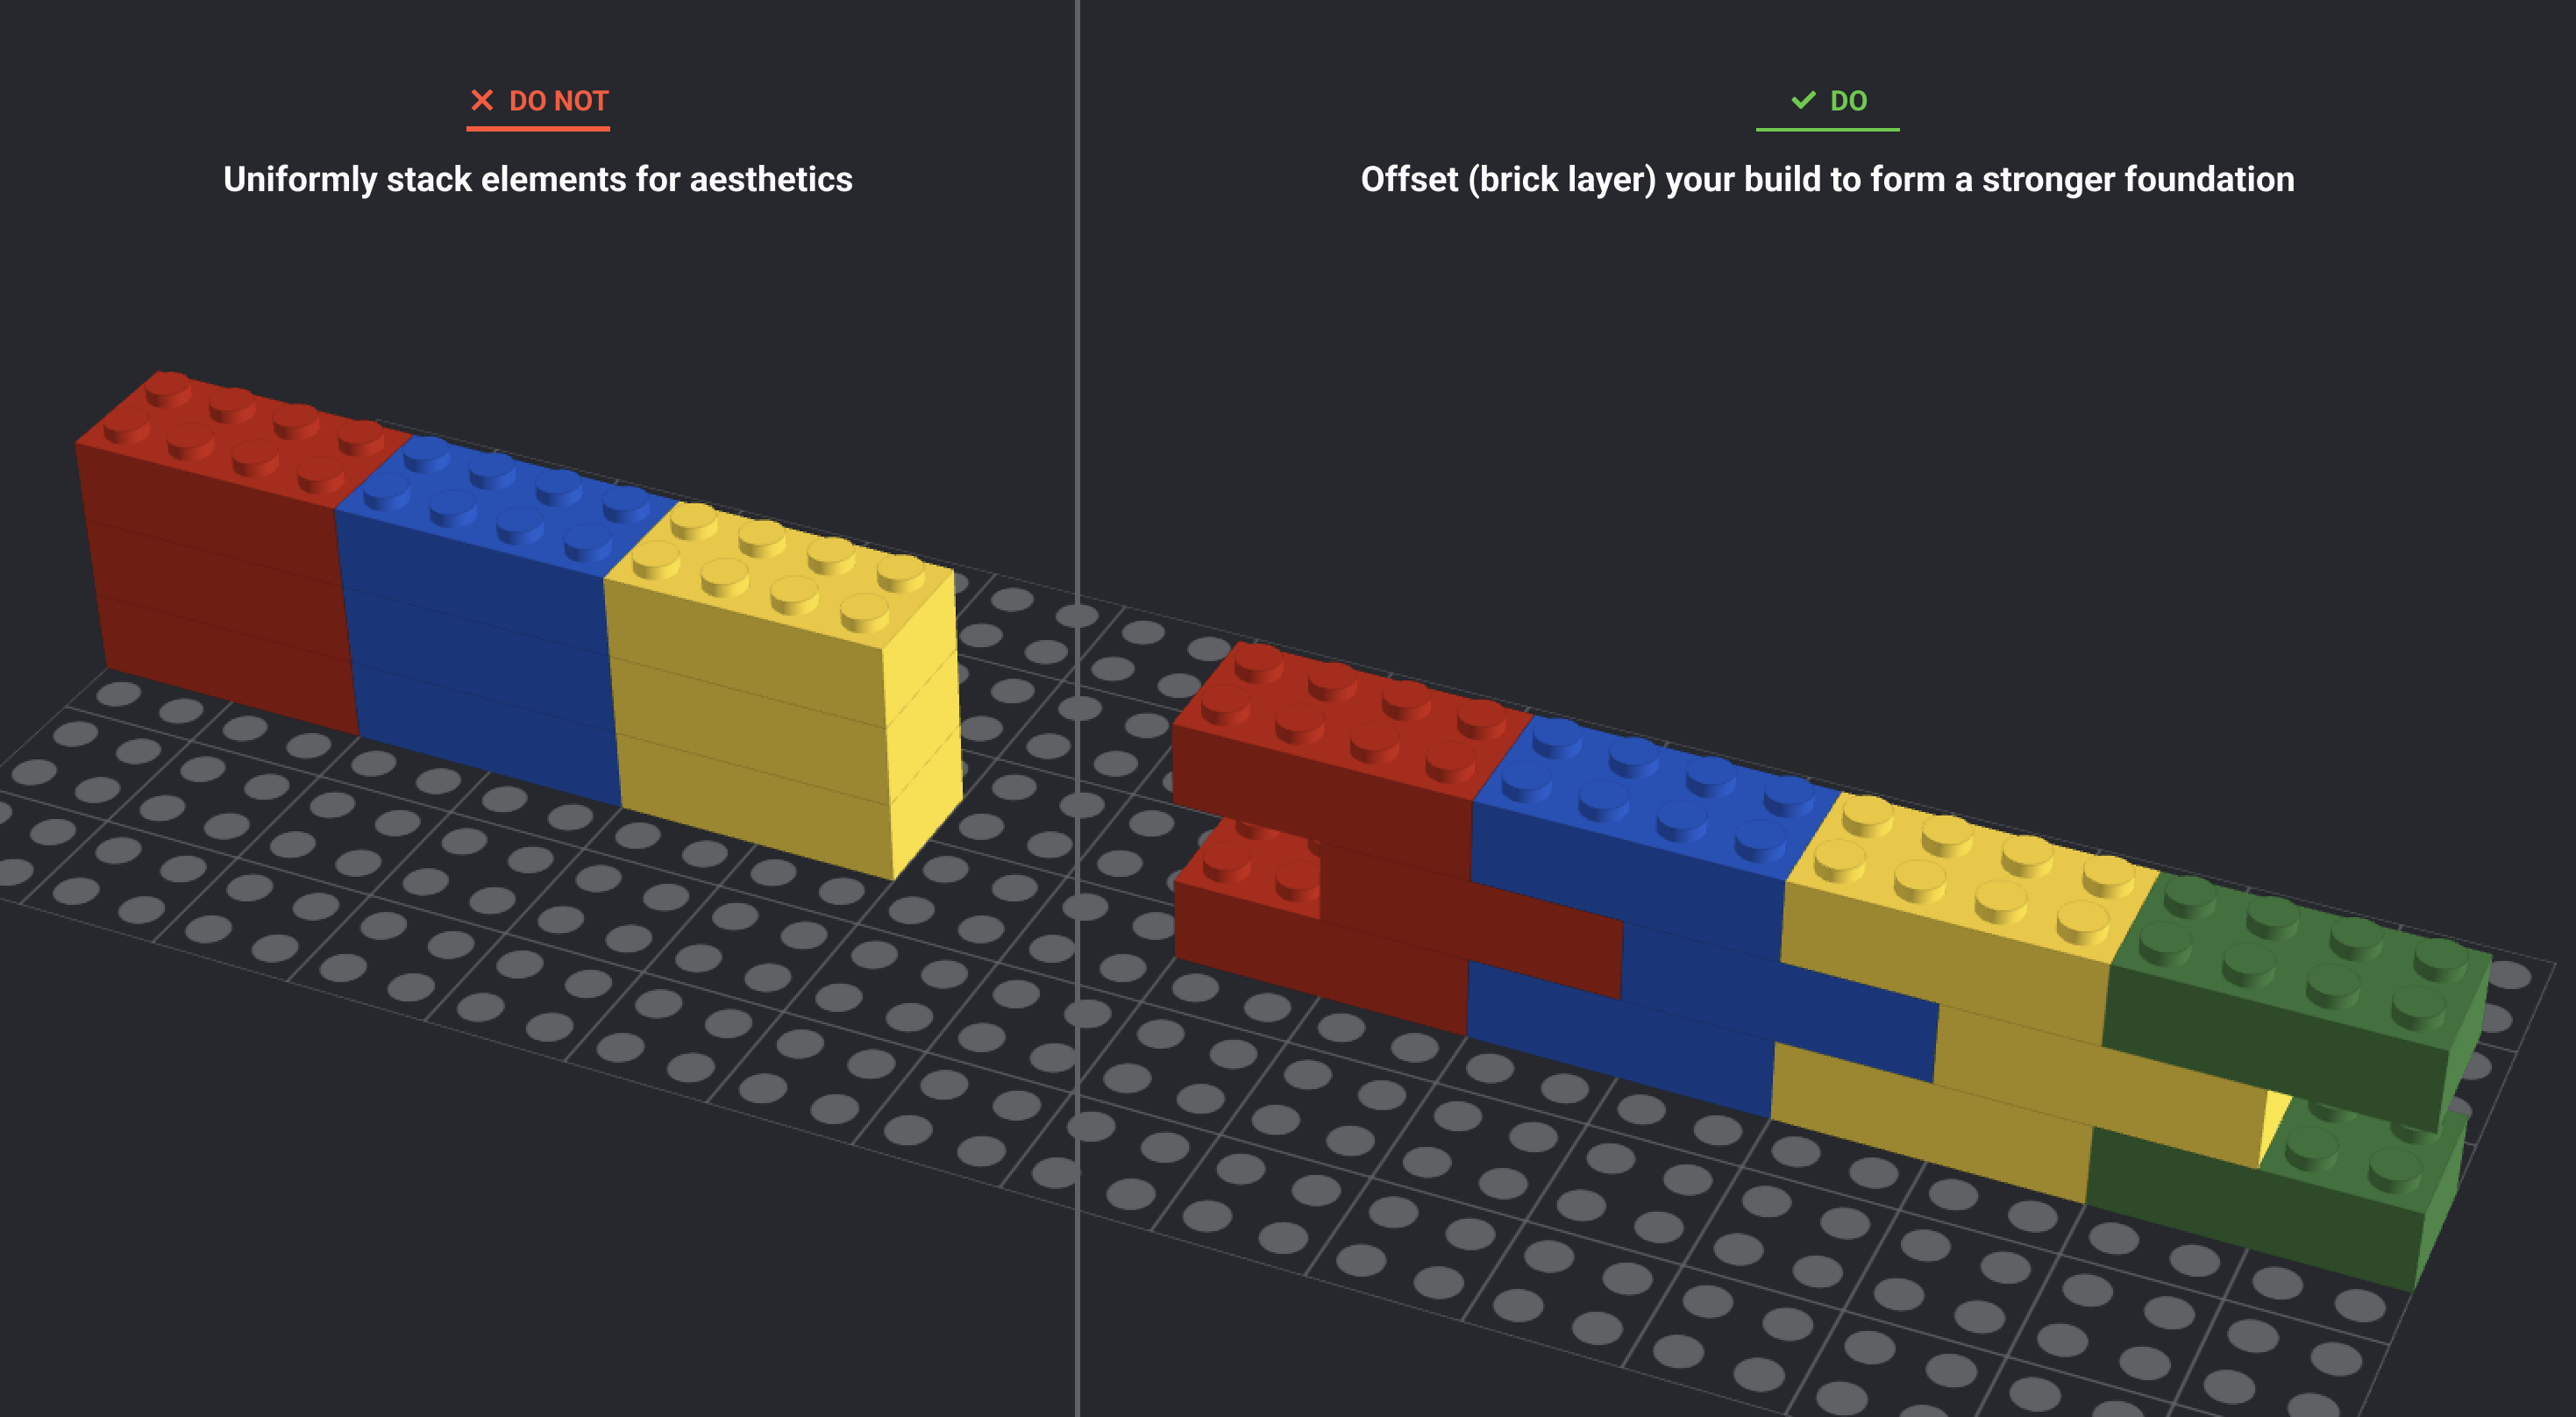
Bricks and plates should overlap whenever possible. Building in stacks may create a certain visual appeal but having a model stay together is more important.
-
The whole model must be stable enough that it can be picked up with two hands and moved without falling apart.
-
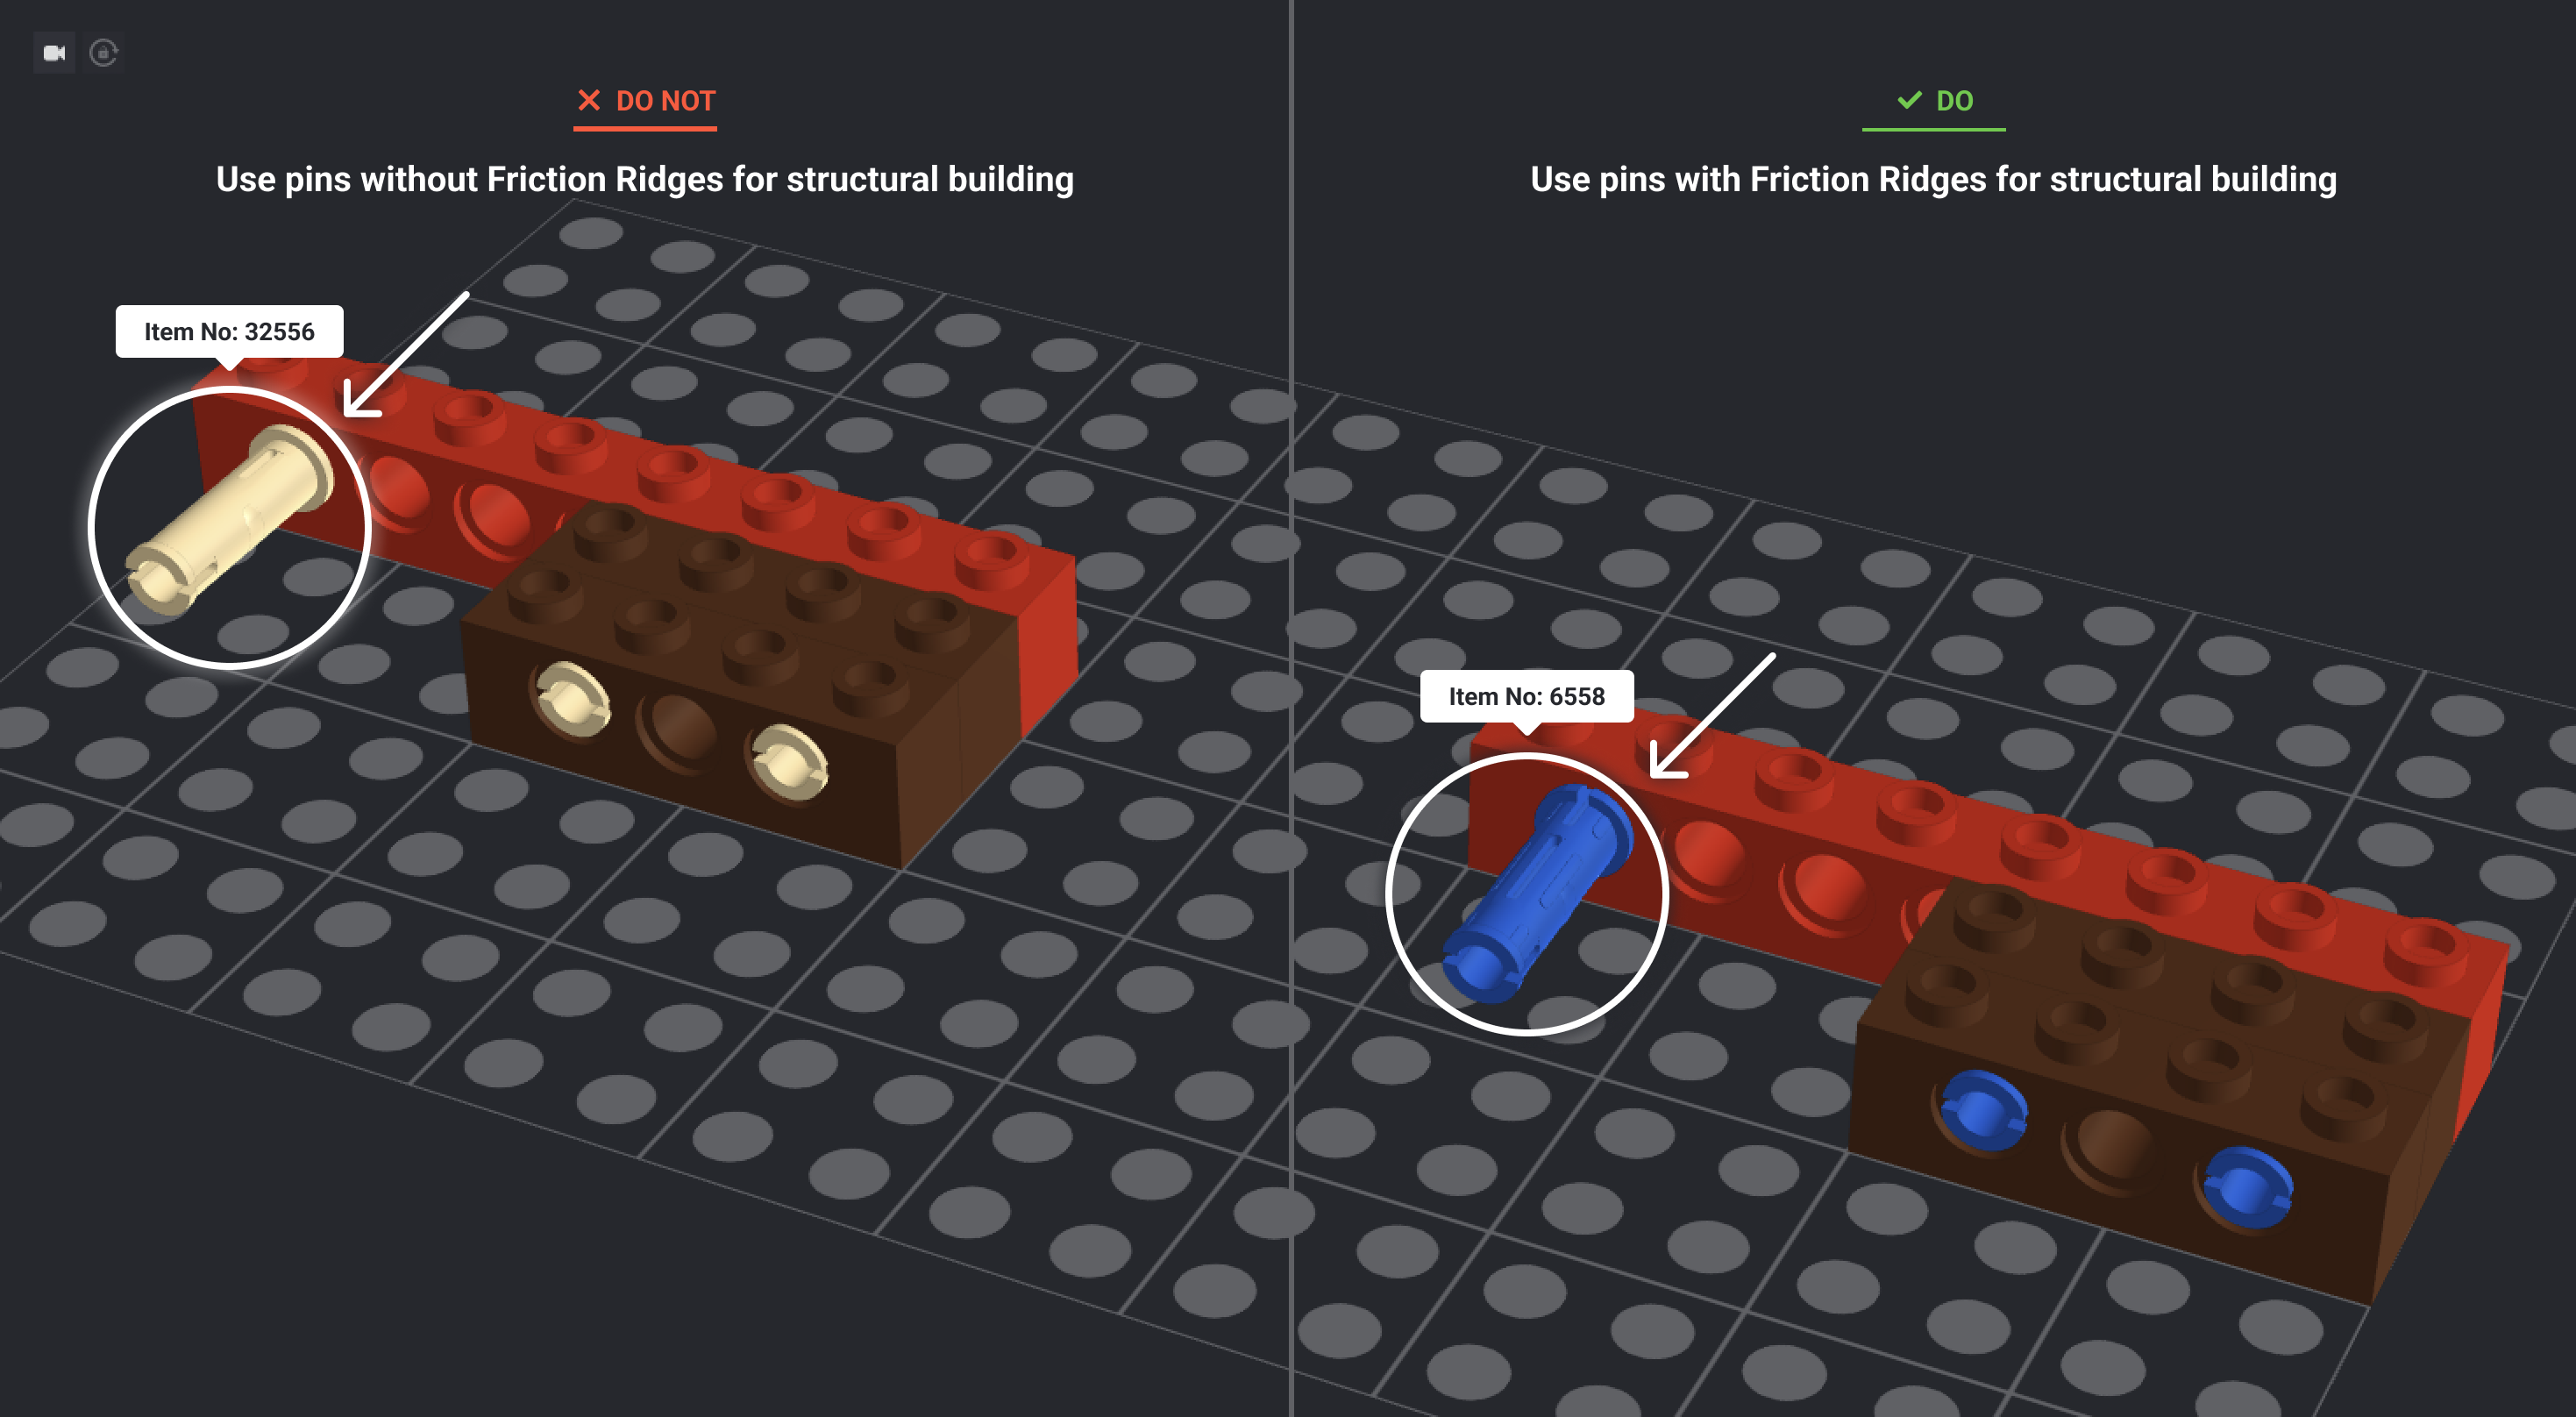
When building with Technic pieces, all sturdy connections must be made using friction pins. Don’t use non-friction pins simply for aesthetic or color reasons.
-
Don’t overbuild by filling bricks inside the model that aren’t needed for stability.
Submodels are a distinct part of a larger model. Build in submodels instead of adding individual parts to one giant model.
-
Label your submodels with intuitive names (e.g., chandelier, second floor) so others using your Studio file can easily navigate around your model.
-
There are no limitations to the number of submodels per design.
-
Add parts to the submodels in the way that you’d naturally build. For example, overlap bricks for strength and make sure that each added brick attaches to another brick.
-
Here’s an example of a submodel: Minifigure Knight #1: includes a head, torso, legs, helmet, body armor, sword, shield and horse.
Your model will have to undergo testing and building with physical bricks by the BDP Team. You should aim to make your design as successful as possible in the world of physical building.
-
Build your model in Studio in the same way you imagine it would be built in real life.
-
Try building your model with physical bricks to test for model safety, stability, and building experience.
-
Separate your model into logical building steps and create instructions. This will help you check for errors which you’ll need to fix BEFORE uploading.
-
Assembling the physical model shouldn’t require specialized building skills or techniques that are learned through years of experience. This includes precision alignment of Technic gears, the easing of Technic elements fixed to an axle, advanced sticker placement techniques and the partial or subjective positioning of elements (e.g., the fractional rotation of 1 x 1 elements).
-
Minifigure construction should take place throughout the building experience and not be confined to the beginning or end of the instructions.
-
Technic movement must be smooth and stable. Don’t use excessive sequences of gears or long, winding power flows or anything that bends or stresses the elements.
-
No movement should require special hand alignment or coordination to work. The movement must work reliably when repeated dozens of times and at various speeds.
-
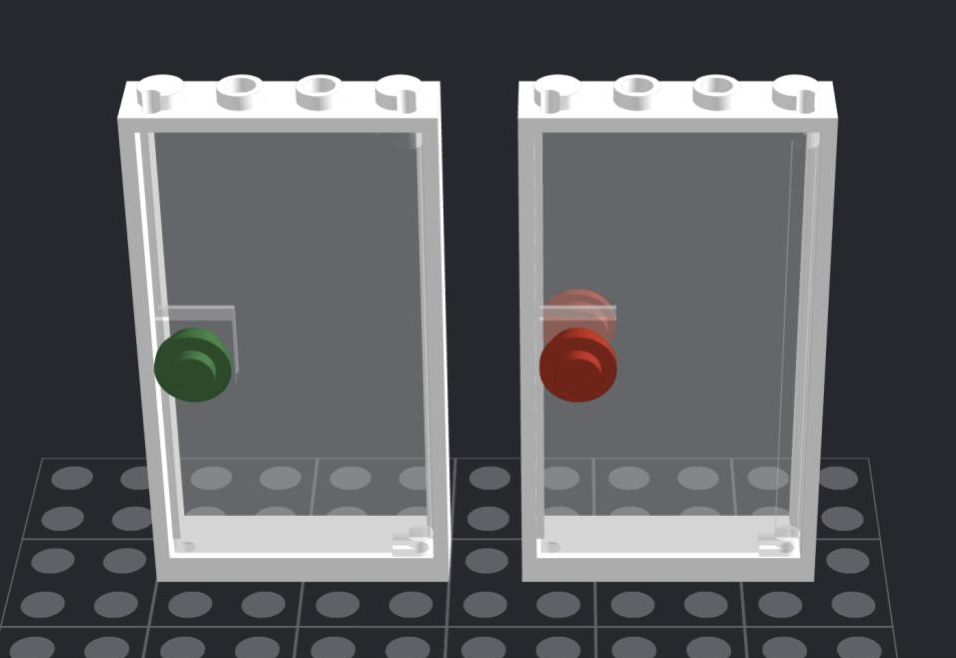
Parts that are designed to function (e.g., propellers, doors, etc.) must function in the model to the complete extent they were designed to function. Hinge plates and hinge bricks are an exception and may be static in the model. Doors must have a door handle on the outside, not the inside. Handles on the inside prevent the door from opening.
-
If combining gears from different families, make sure they mesh correctly without binding or slipping.
-
Studs cannot be inserted into Technic pin holes.
-
Only flexible parts should be bent. Bending any other parts is strictly prohibited.
-
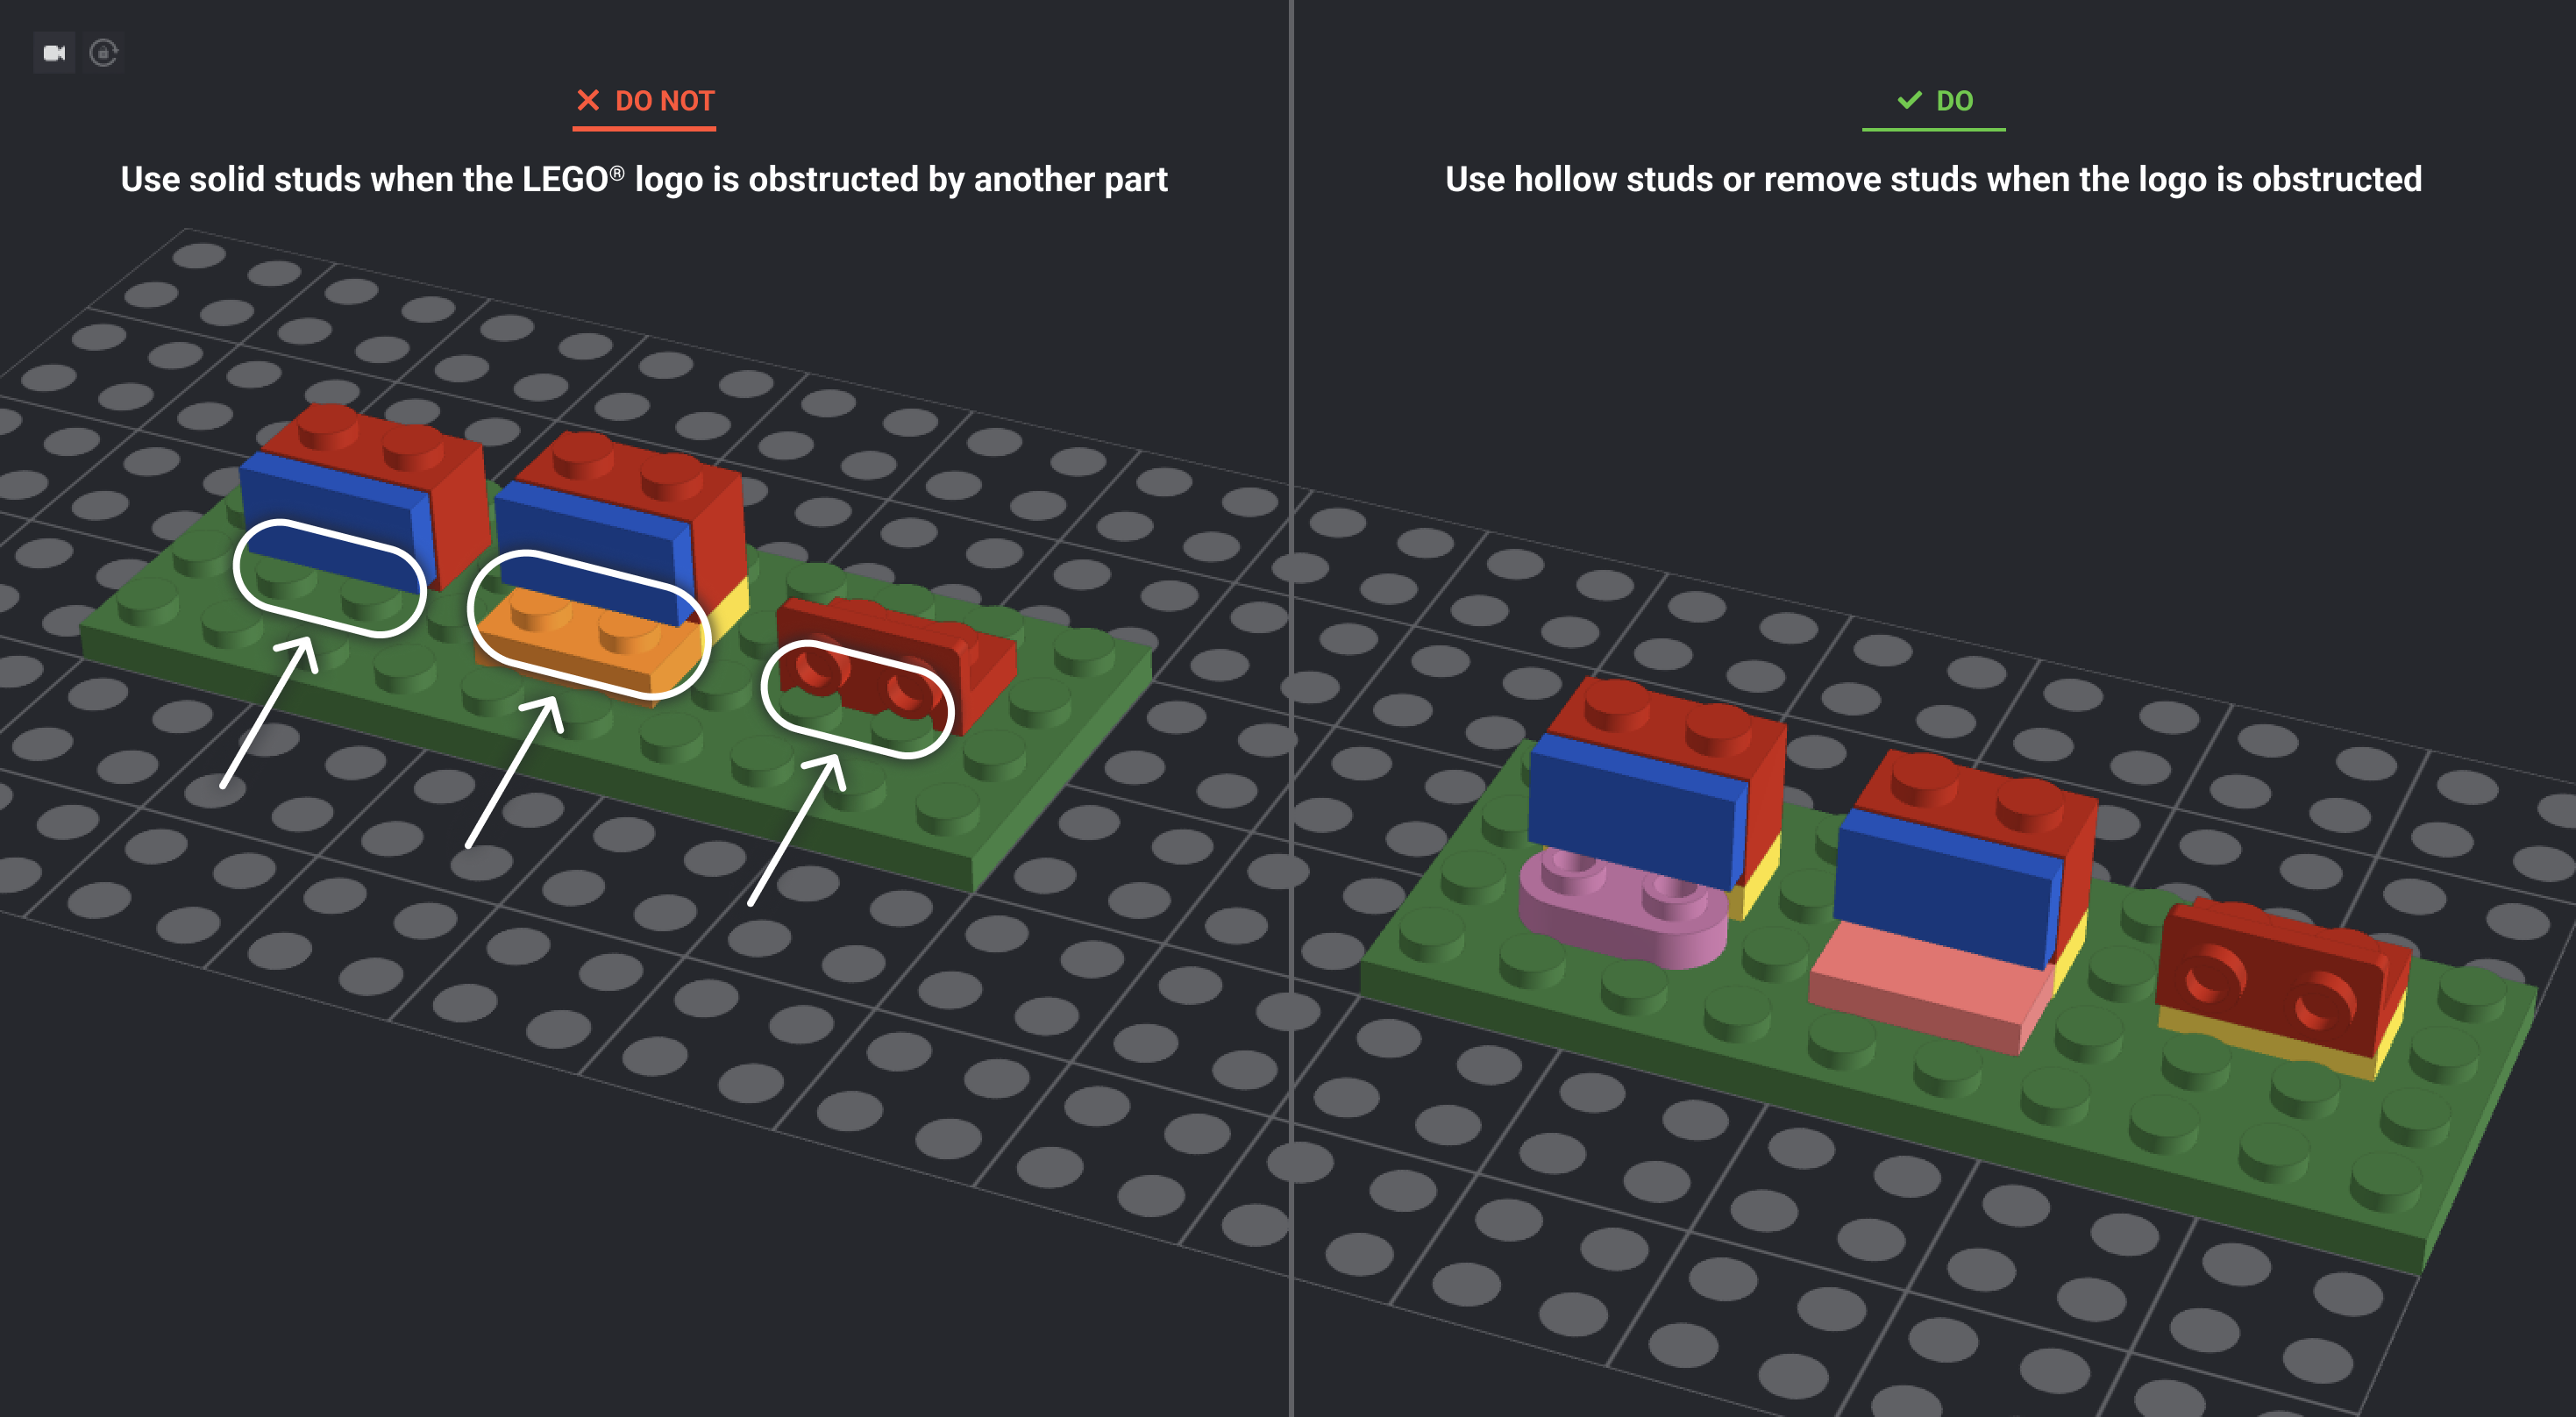
When building horizontally (Studs Not on Top or SNOT), be careful not to interfere with the logo on the stud.
-
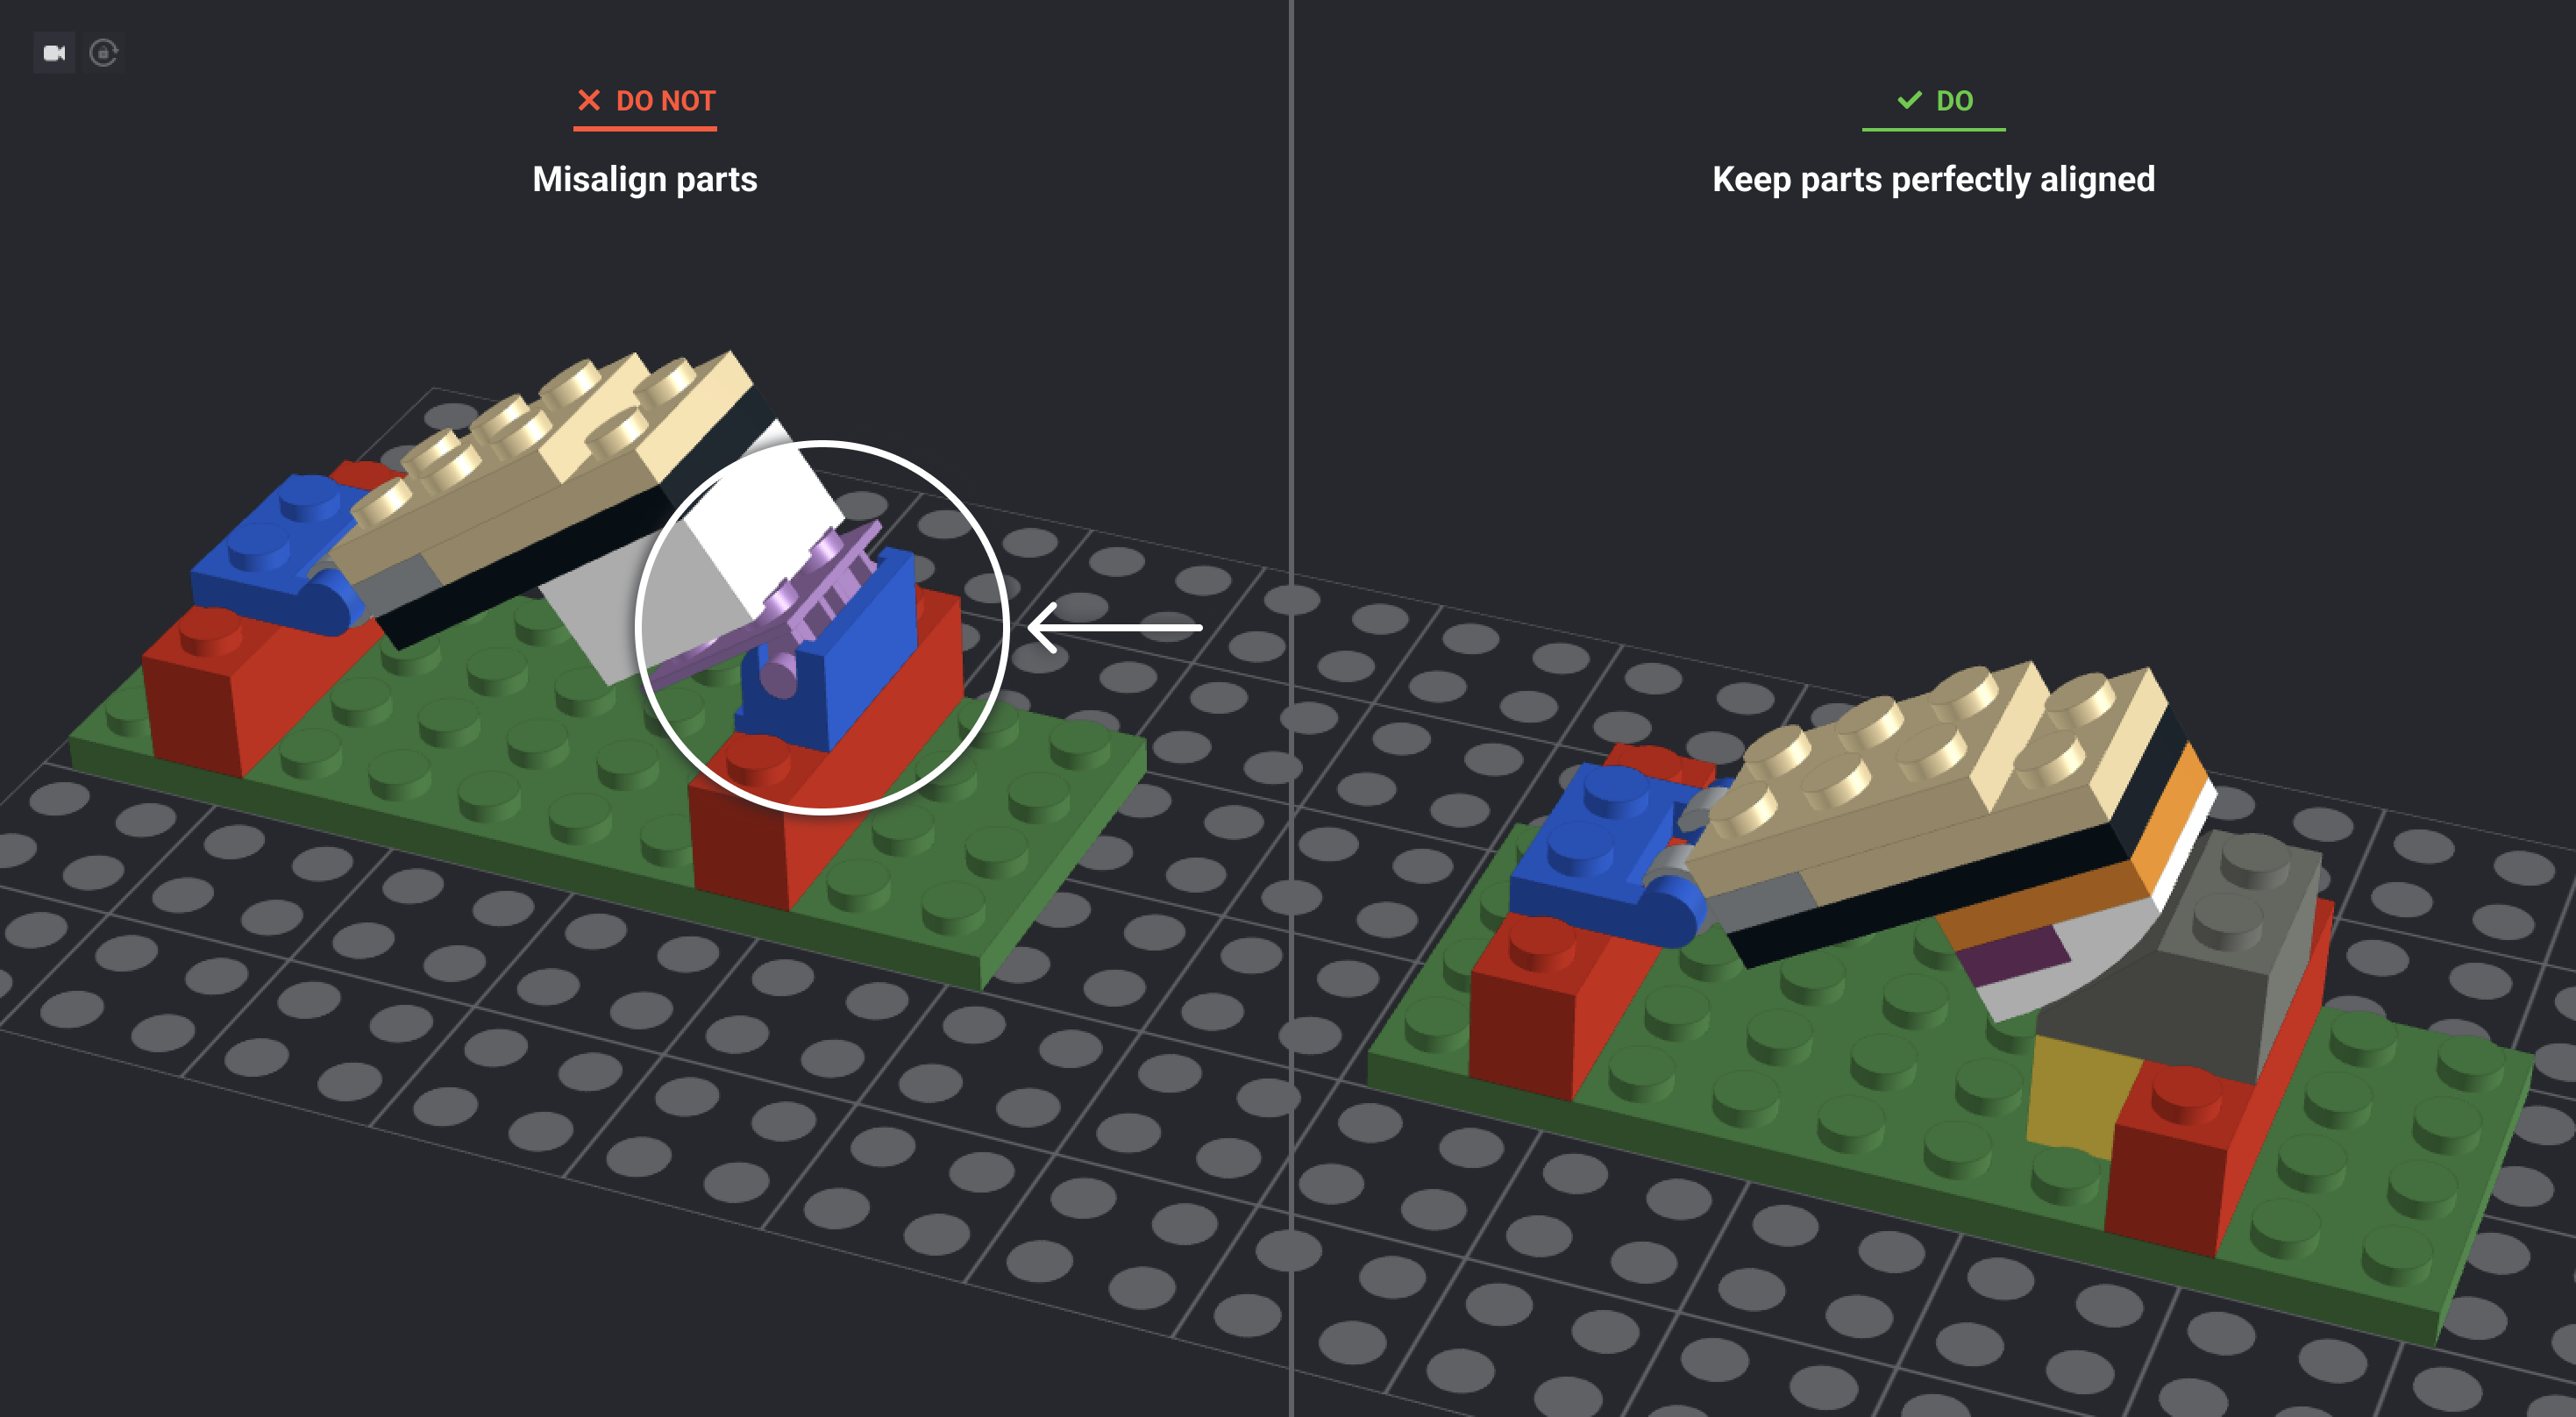
All angles that are closed at both ends must be perfect. The parts must form a legal connection in Studio and must be geometrically sound unless variable-length elements are used to compensate. Designers need to be aware that any angle other than the standard angles of wedges and connectors may present problems and will need to be examined closely. For angled roofs especially, designers are encouraged to leave one end of the roof unattached to avoid an issue with a closed angle.
-
There’s a maximum of one minifigure for every 325 parts. See this table for minifigure count limits based on your part count. Skeletons do not count as minifigures.
Part Count Minifigure Limit 400-650 2 651-975 3 976-1300 4 1301-1625 5 1626-1950 6 1951-2275 7 2276-2600 8 2601-2925 9 2926-3250 10 3251-3575 11 3576-3900 12 3901-4000 13 -
Each minifigure head may only be used once. Skeleton, statue, classic smile and alien heads do not apply to this rule.
-
Minifigures must be constructed logically with matching torsos, hair, etc. Minifigures will go through a governance process similar to the model itself.
-
If you use a minifigure head with printing on the front and back, hair must be used to cover the reverse side of the head.
-
Minifigures from different eras should not be mixed. For example, please do not use Classic Space minifigures with Modern Space figures in the same model.
-
Minifigures must be complete. You cannot remove head, arms, legs, hips, or hands from minifigure torso.
-
Stickers should only be used where needed.
-
A maximum of one sticker design may be used for every 250 parts. Duplicate stickers don’t count toward the maximum. However, there’s a hard limit of 25 different stickers per model.
-
A single sticker shouldn’t span across multiple parts.
-
Stickers can’t be placed on surfaces that curve in multiple directions.
-
Stickers must be free of intellectual property (IP).
-
Complex designs may need to be simplified as stickers can only contain a certain level of detail.
-
Colors are limited to the official LEGO element colors.
-
Stickers must cover the entire surface on which they are applied, except for stickers with a transparent background.
-
The background of sticker sheets can be white, transparent or mirrored.
-
The artwork on the sticker must not contain any objectionable content, suggestive text or inappropriate images.
-
Confusing configurations of stickers must be avoided (e.g., the same sticker applied to different colored parts, used upside down, etc.).
-
All stickers on a given sheet must be easy to distinguish from one another.
-
Stickers cannot be used on minifigure parts.
-
Please include a PDF, PNG, or JPG/JPEG file of your sticker designs in one file when uploading your submission.
-
Stickers and instructions will be redesigned by a LEGO graphic designer.
-
Whenever possible, use iconography or images instead of text on stickers.
-
Designers may not put their name, username, or identifiable information on stickers.
-
When designing custom parts using the Studio tool Part Editor, save all custom stickered parts with the part name and color in the name. For example, for a 2x4 tile with a dog bone graphic on the sticker, you could name the part file “2x4 Tile Red Dog Bone.” This will help the design team when reviewing your submission.
Building instructions
You are responsible for creating building instructions for your design that follow the requirements below. Note: Building instructions will be redesigned by a LEGO graphic designer, so your instructions are for build flow only (not graphical layout).
Guidelines for the first step
-
Start with your foundation elements (e.g., baseplate, vehicle base, etc.).
-
Elements laying side by side with no connection are not allowed.
-
Keep the number of elements to a minimum (1-3).
Guidelines for the following steps
-
Keep the viewing angle as consistent as possible and limit the number of changes. Any angle changes should be noted for when you enter “Page Design” mode.
-
Only use 5 different elements at most and 10 total elements or less in each step.
-
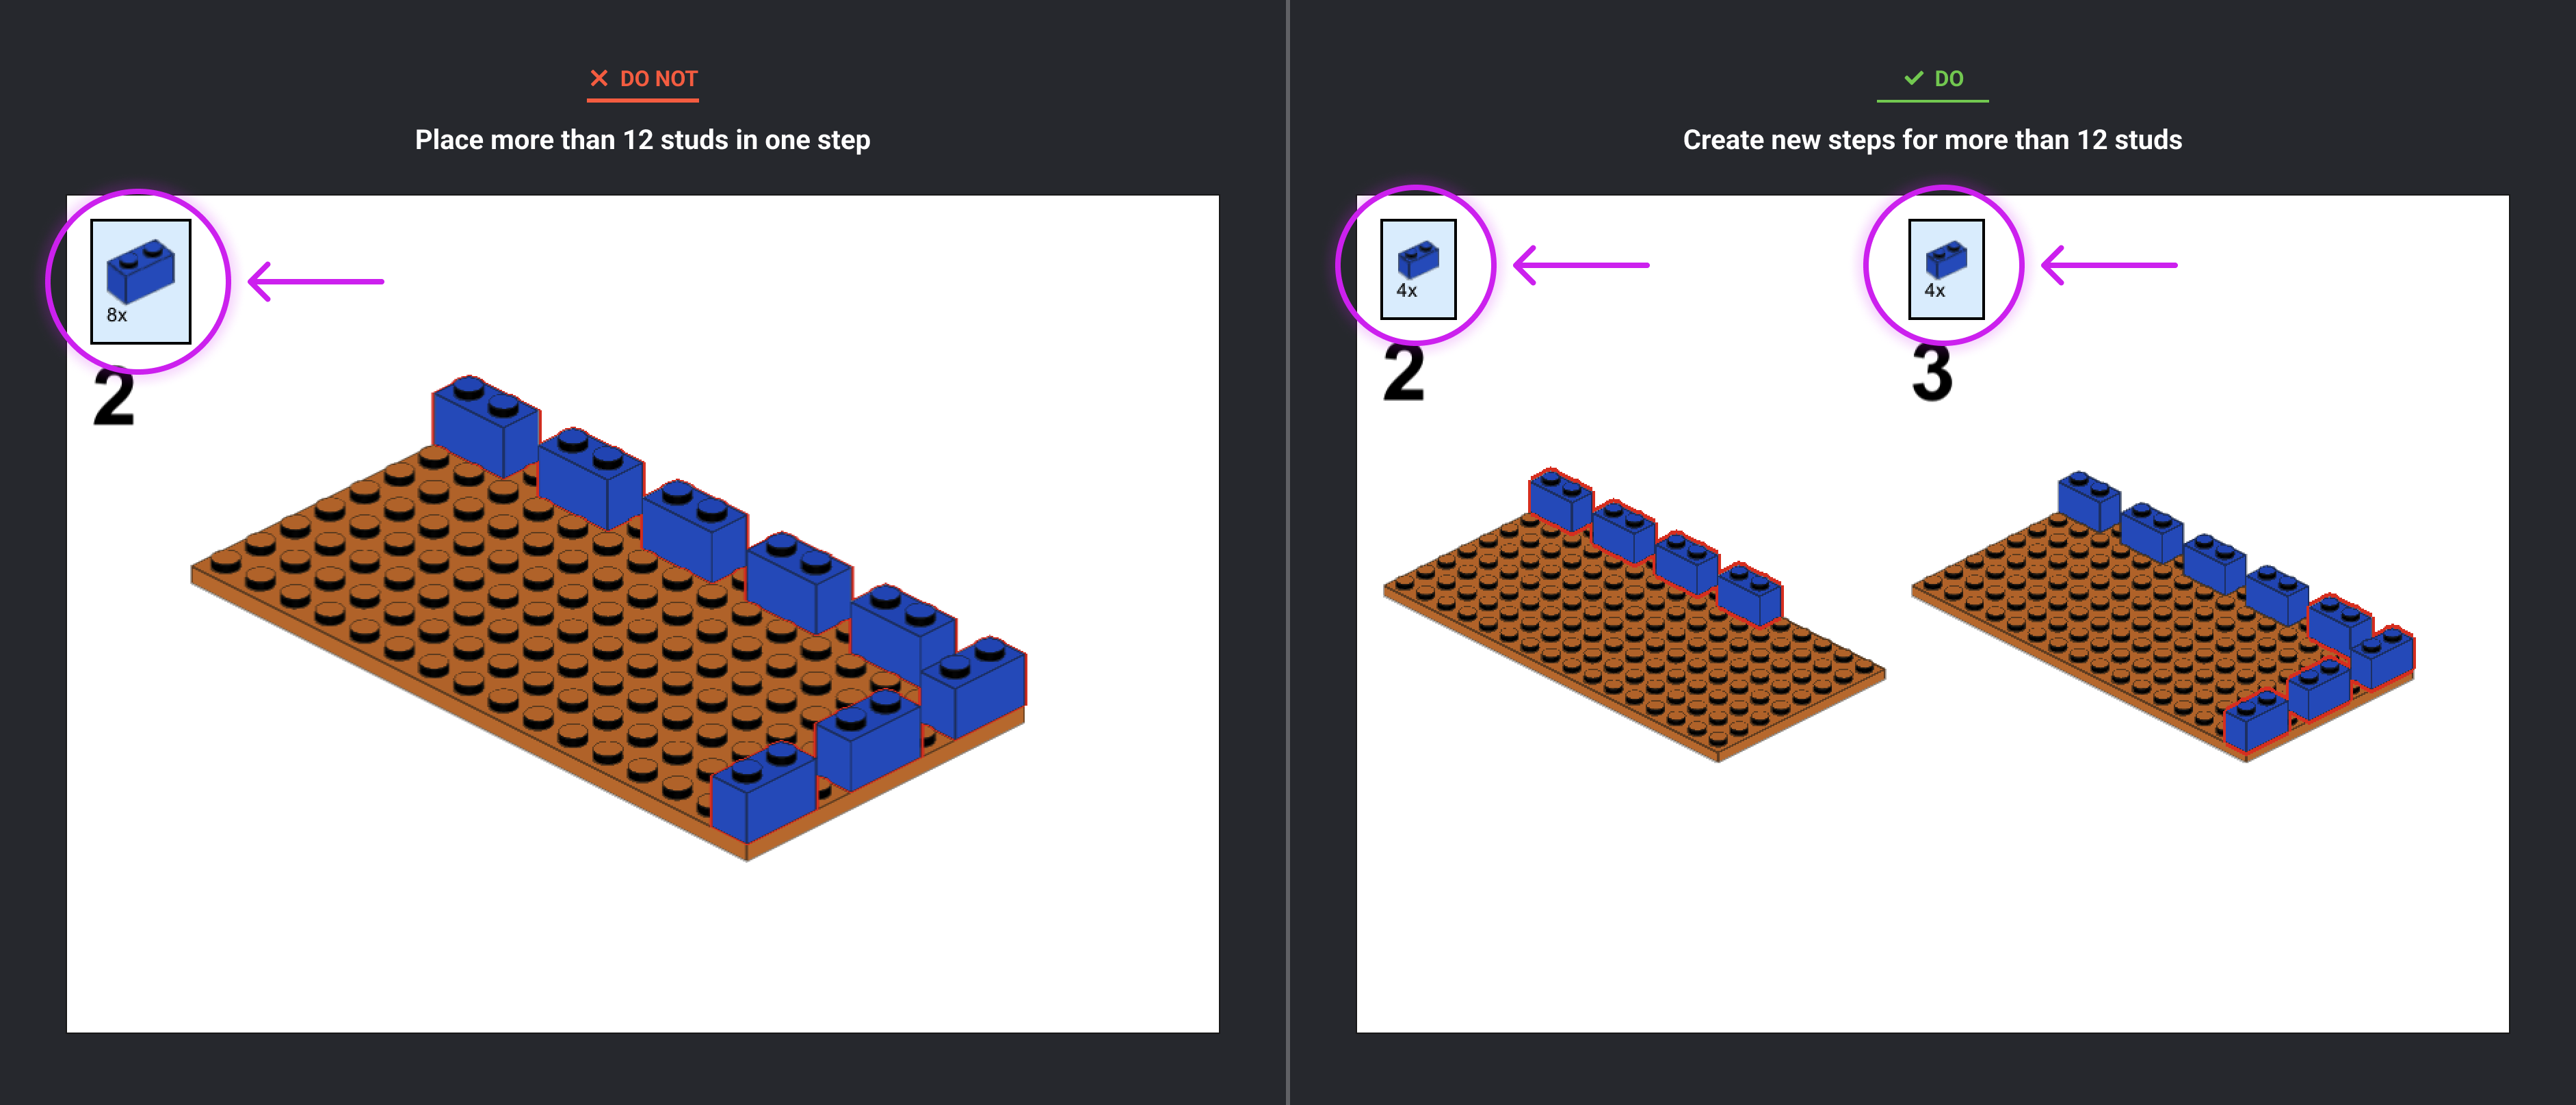
Don’t build more than thirty studs in any direction unless it’s one full element (e.g., 32x32 base plate, 2x16 plate, etc.).
-
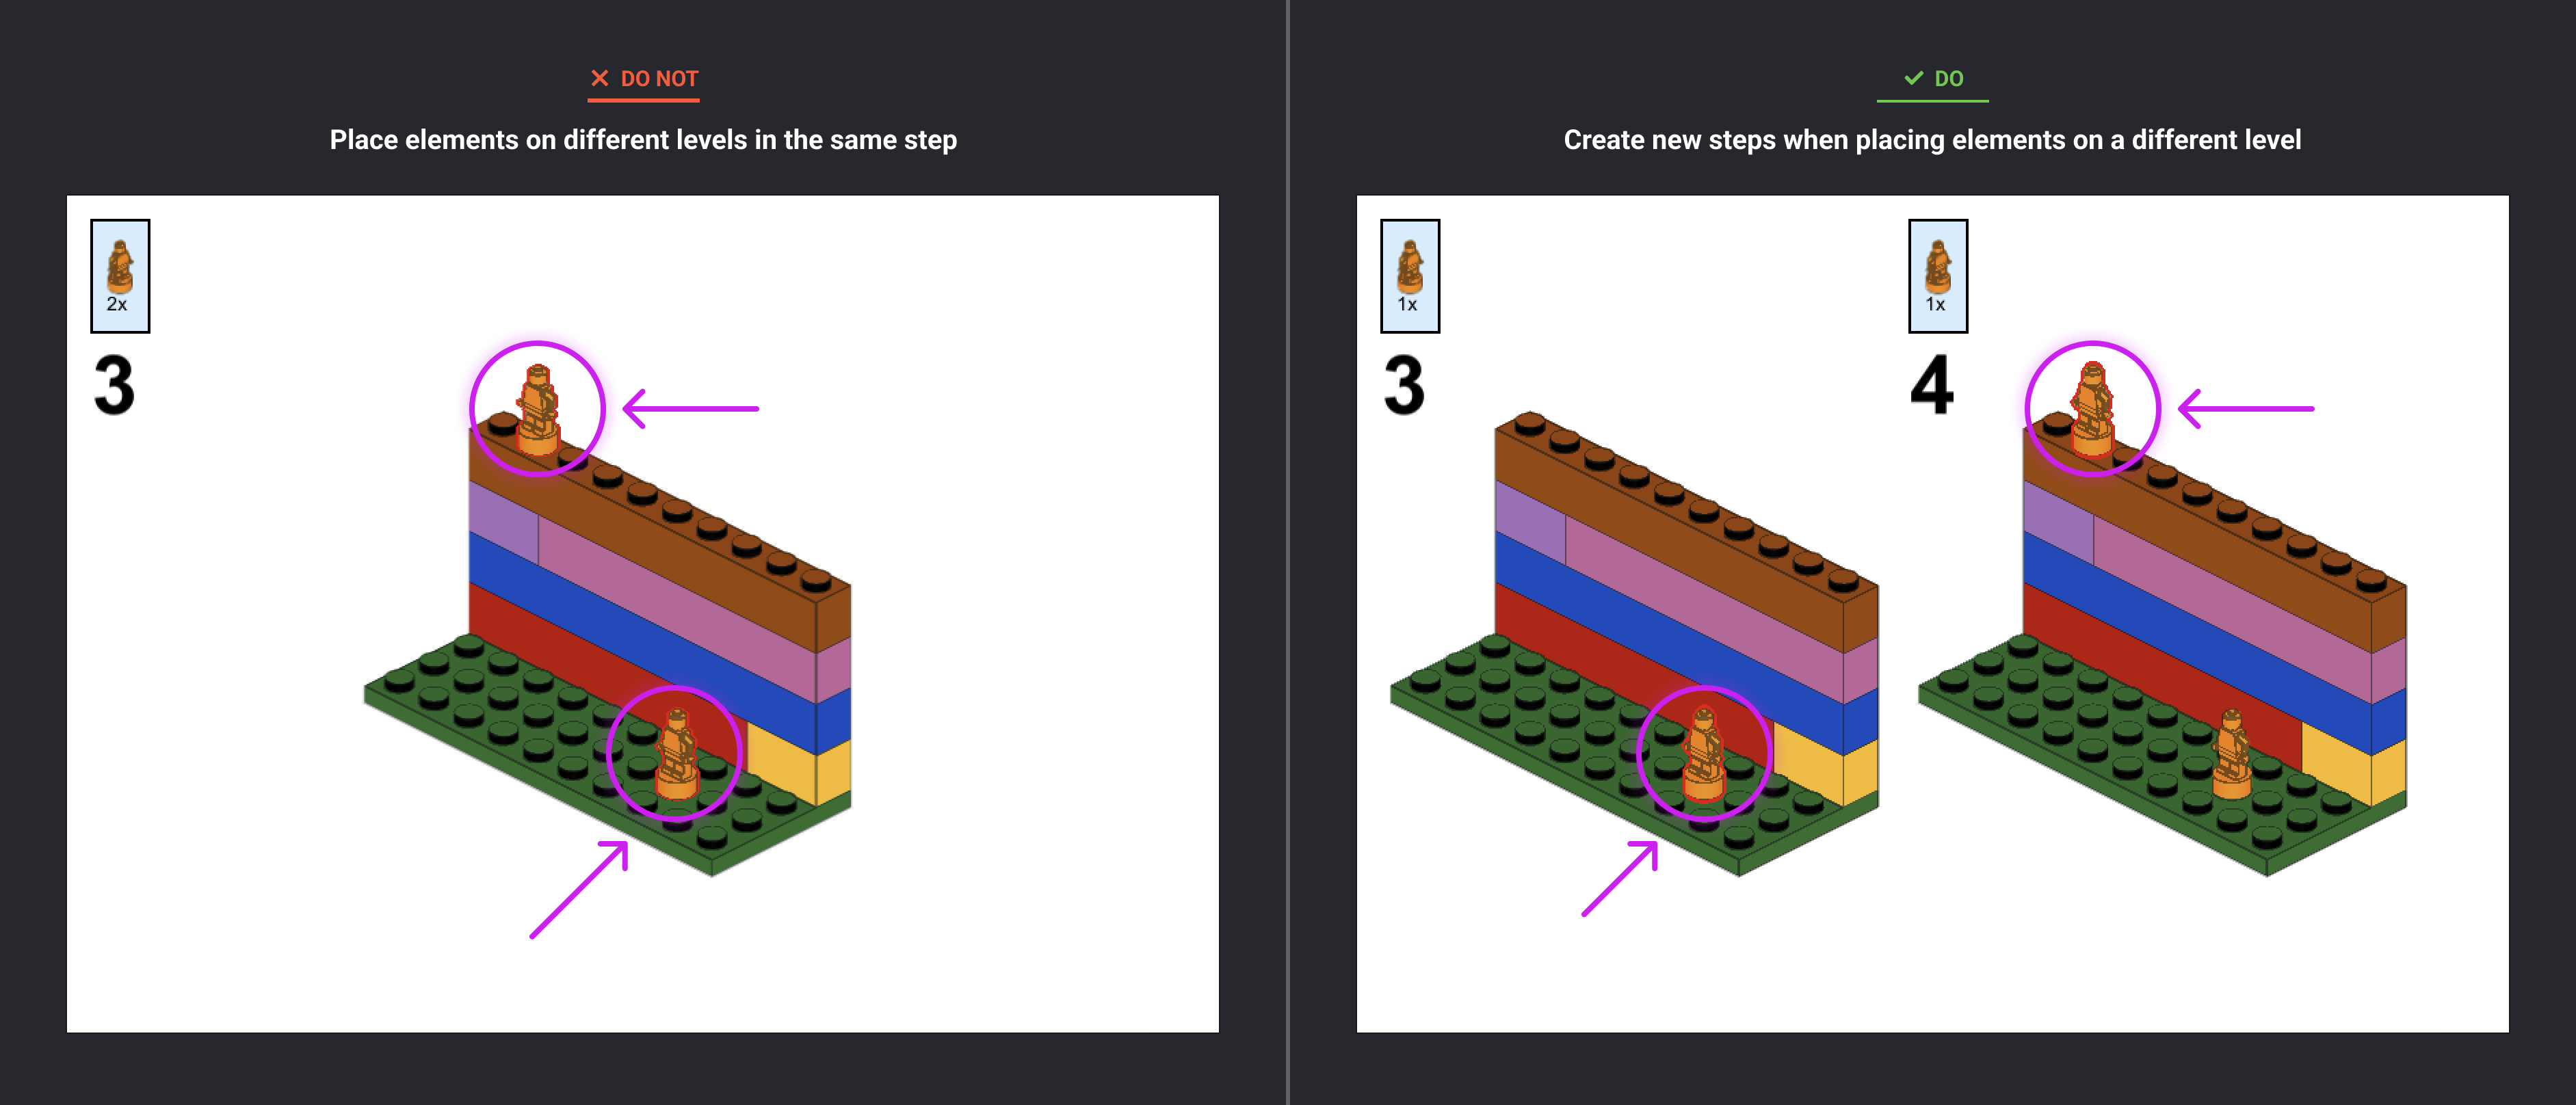
Avoid placing elements on different levels in the same step (e.g., when building a wall, don’t place elements on the bottom and top of the wall on the same step).
-
Tall and narrow elements or submodels should be in later steps, not in the beginning or midway point of the instructions.
-
Insert small decorative elements or submodels before enclosing the model. This means if you’re building a house, construct three of the walls then add any furniture or other submodels inside before adding the fourth wall and roof.
-
Once an element is placed, it can’t be removed or hidden in future steps.
-
Building techniques must be consistent throughout the model.
-
Sequence your building steps so there’s a logical connection where all elements are attached. In other words, there should be no floating elements in the instructions.
Page design – page setup
-
When you’re in ‘Page Design’ mode, ‘Page Setup’ is located on top right corner.
-
Clicking on ‘Page Setup’ will open a new display window.
-
Change the ‘Size’ to ‘Letter’.
-
Set the ‘Margins’ to ‘10’ pixels for all sides (Top, Bottom, Left, and Right).
-
‘Apply’ changes.
Page design
-
All elements in the step must be visible.
-
Avoid covering the model with the Parts Window and Step Number.
-
Keep viewing angle changes to a minimum.
-
Insert ‘Flip’ icon when changing viewing angle of 90 degrees or more.
-
The color of the parts highlight feature is set to Red by default. You can change this if another color is more suitable.
-
Insert a Size Guide when using elements that look similar (e.g. Technic Axle 3L and Technic Axle 4L).
Submission upload
Submissions will open on April 14th, 2025 at noon Pacific time. You will have to submit the following info in our new upload portal:
-
Design title
- Design title cannot include LEGO in the title or any other LEGO property. Buildings should not include “Modular” in the title.
- Castle and Classic Space models should not include the faction name in the title (e.g. Lion Knight, Wolfpack, Blacktron, etc).
-
Description
- Official LEGO set numbers should not be included in the Model Description.
- No social media links or any other types of links in your product description. There is a field in the upload template to enter a URL to a YouTube video overview of your model and its features if you like.
-
Optional: Internal notes for the BDP Team. We will accept your notes via a word doc, PDF, or within a text box field.
-
Studio submission file
-
High resolution rendered images of your design in multiple angles (up to 10)
- Screenshots of your model in the Studio app are not allowed.
- The first image must be a render, subsequent images can include brick-built photos.
- Renders and photos cannot include prominent use of the LEGO logo (except on the model itself) or of official LEGO sets.
Tips
- Take notes while you’re building so it is fresh in your head.
- If your build uses any floating bricks, make sure you mention it in your notes.
-
Model images can only include the models included in the design. No reference models should be visible in background, or for scale. This includes “greyed” or “transparent” models in the background.
Use the following settings when rendering your creation:
-
Render quality minimum: High
-
Ratio 4:3
-
Resolution minimum: 1080 pixels wide.


